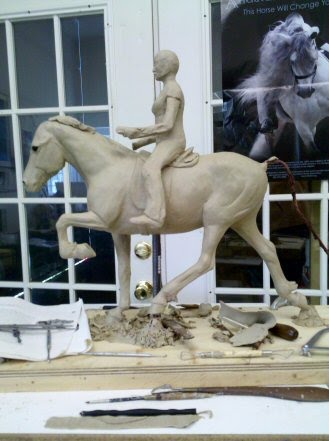
Today I made stirrups for my rider. That's a lot harder than you'd think. It took me a while to find the right size wire to be the top of the stirrup (to look the right size while covered with clay) and to make the tread of the stirrup strong and straight. I used scraps from the perforated aluminum sheet I'm using as the armature for Feather's wings to make the tread strong and straight and aluminum armature wire for the top. The bottom loop where the stirrup leather goes through was added by just putting a roll of clay there and carving it down. You may be able to see that on the pic of the rider with the stirrup in place.
That pic is a bit crooked, sorry. The leather goes up inside the rider's leg and is adhered to her leg and the horse, in the appropriate places. I'll cut the stirrup off the piece just above where the leather goes through the stirrup when I get ready to send it to the foundry. It would just drop off if the piece was dropped or shaken as it will be in shipping. They can weld it in place in bronze.
The boots and breeches are done, and I think you can see the bottom of her shirt. She was wearing a blouse that wasn't tucked in, and for now, I'm sculpting what she was wearing. I'm going to send her pics soon so she can decide if she wants her shirt tucked in, sleeves on the shirt (her shirt was sleeveless), etc.
This shot's a bit closer, but also crooked - hard to get great shots with a phone. I'll straighten these pics and re-upload them when I have more time. I'm kinda rushing to get this online right now.
BTW, this hind foot will soon be cut free of the wire holding it to the ground. This foot in reality wouldn't have any dirt splashing up to support it, so I have to make it free. I talked to my foundry about it to make sure having only two legs on one side would be strong enough to support a piece this big without it bending. Bronze is soft, after all - it's mostly made out of copper. Anyway, they said it should be fine, and they'll put bronze rods inside the legs touching the ground to strengthen them if they think that support will be needed.
When I cut this foot free, I will cut the wire up inside the hoof (thus ruining that nice hoof, so I'll have to sculpt it again) and then I'll put a wall, sole and frog in the bottom of the foot.
This is how the whole piece looks right now. I haven't done any work above the waist - it's all just "placeholders" for now, measured pretty well, but not sculpted anywhere near what those parts will be like when it's finished. I need to raise the shoulders a bit - they're too low.
Anyway, that's progress to date! Comments and questions are welcome.
Musings on creativity, producing art and fiction and whatever else strikes my fancy.
Wednesday, June 09, 2010
Thursday, June 03, 2010
Progress!
It finally looks like I'm getting somewhere on this piece! A lot of the previous work has been painstaking and tedious, trying to get the horse built properly, making sure there are no dips or bumps where there shouldn't be, and making the horse a functional being with all the joints in the proper places, etc. Now I've added a saddle and the rider. The rider will be removed for shipping - she's only attached by a couple of wires sticking out below her seat bones into the horse. She'll be welded or soldered in place by the foundry when this piece is cast in bronze.
The saddle is supposed to be an Icelandic saddle. In addition to looking at the photos I took of my client's two saddles, I researched them online and found quite a wide variation in how they look. I'm going with the English show saddle look rather than the quilted seat I found on several Icelandic saddles simply because it's less distracting visually to have a smooth seat rather than a quilted one. I will probably cut the flaps a little shorter - they look too long in comparison with the rider's leg.
I've had to redo the cantle of the saddle about five times now, trying to get it placed right and to make it fit the horse and rider both as well as possible. I think I'm about there with the cantle. Now I'm working on the length of the rider's legs and the shape of her boots. I realized I had cut the wire too short on one leg and had to add some wire to have a good support for her foot. That's why I'm posting these pics today, to show you how I did that repair.
I've cut off the clay at the bottom of her leg, exposing the wire. I then attached a lighter wire, wrapping it securely around the existing wire of the leg, using pliers to help me get it as tight as possible. After wrapping it several times around the larger wire to make it as secure as possible, I started twisting the wire to both strengthen the wire and to give the clay something to bite into so it won't slide around. (Aluminum wire is slippery to clay if it isn't either twisted itself or isn't wrapped around another wire.) I doubled the twisted wire (shown above) back on itself and twisted it some more to make it stronger (not shown), then added clay over that to make the new foot.
Here's a closeup of the wire before I folded it back on itself and twisted it again.
Here's the other side of the piece. This leg is actually a bit too short too, but there's plenty of wire there. I'll pull the clay off the foot, straighten the wire for a short distance to lengthen the leg, then bend the end up to support the foot and add clay to make the boot again.
I'm having to fight my dressage training in positioning the rider. She doesn't ride dressage nor do other Icelandic riders (with a few exceptions I know of), so putting her in a dressage position would be wrong. I haven't had this much trouble positioning a rider in a long time - I guess that shows my dressage training is becoming ingrained! But I need to be careful about that with my art. Not all riders ride dressage.
That gorgeous picture behind the sculpture is the International Andalusian & Luisitano Horse Association (IALHA) poster from a couple of years ago featuring the gorgeous stallion, Santiago. His mane really does reach down past his knees and he seems to have a lovely disposition. I was fortunate enough to see him at the Midwest Fiesta in 2008 and was given one of these posters then (I had my art booth there marketing my art while I was working on the original of "Feather," which is an Andy stallion now available in bronze). I had no idea at the time that within a few months of that show, I'd have my very own half-Andalusian (El Paso Aricos, my dressage horse). Surprise surprise!
This is a picture of my handsome Ricos with my daughter, trainer Jennifer Truett of Dancing Horse Farm, Lebanon OH (www.dhf-oh.com) riding him. Since I mentioned him in reference to that IALHA poster, I thought I'd include his picture here. I like this picture so much, I use it as my desktop.
Back to the sculpture: Don't worry about the rider's face - right now her facial features are more "markers" than anything else. She doesn't look like herself at all yet! Her face is even a bit mashed because I grabbed her head and changed the angle of her neck and head from the side (they were too far back). Her arms and hands haven't been worked on at all yet. I'll get to them, don't worry!
A lot of sculpting (the way I do it, anyway!) seems to be "take two steps forward, three steps back" at times. As I work around the piece, I may find that something that looked and measured right before is now too long or too short in relation to some other part and the reference material. Just by bending one leg of the rider down so it laid properly along the horse's side changed the way it looked lengthwise, so I had to make some adjustments. That kind of thing happens frequently. Just one of the many challenges of 3-D work!
The little lump of clay on the horse's neck is a sign of my eagerness to get to the mane and tail. They're some of the last things I do on a sculpture, but they're also FUN so I'm eager to get to them. But it's too soon, so I was just messing around and left it there.
I'm pleased with the progress so far. Yay!
The saddle is supposed to be an Icelandic saddle. In addition to looking at the photos I took of my client's two saddles, I researched them online and found quite a wide variation in how they look. I'm going with the English show saddle look rather than the quilted seat I found on several Icelandic saddles simply because it's less distracting visually to have a smooth seat rather than a quilted one. I will probably cut the flaps a little shorter - they look too long in comparison with the rider's leg.
I've had to redo the cantle of the saddle about five times now, trying to get it placed right and to make it fit the horse and rider both as well as possible. I think I'm about there with the cantle. Now I'm working on the length of the rider's legs and the shape of her boots. I realized I had cut the wire too short on one leg and had to add some wire to have a good support for her foot. That's why I'm posting these pics today, to show you how I did that repair.
I've cut off the clay at the bottom of her leg, exposing the wire. I then attached a lighter wire, wrapping it securely around the existing wire of the leg, using pliers to help me get it as tight as possible. After wrapping it several times around the larger wire to make it as secure as possible, I started twisting the wire to both strengthen the wire and to give the clay something to bite into so it won't slide around. (Aluminum wire is slippery to clay if it isn't either twisted itself or isn't wrapped around another wire.) I doubled the twisted wire (shown above) back on itself and twisted it some more to make it stronger (not shown), then added clay over that to make the new foot.
Here's a closeup of the wire before I folded it back on itself and twisted it again.
Here's the other side of the piece. This leg is actually a bit too short too, but there's plenty of wire there. I'll pull the clay off the foot, straighten the wire for a short distance to lengthen the leg, then bend the end up to support the foot and add clay to make the boot again.
I'm having to fight my dressage training in positioning the rider. She doesn't ride dressage nor do other Icelandic riders (with a few exceptions I know of), so putting her in a dressage position would be wrong. I haven't had this much trouble positioning a rider in a long time - I guess that shows my dressage training is becoming ingrained! But I need to be careful about that with my art. Not all riders ride dressage.
That gorgeous picture behind the sculpture is the International Andalusian & Luisitano Horse Association (IALHA) poster from a couple of years ago featuring the gorgeous stallion, Santiago. His mane really does reach down past his knees and he seems to have a lovely disposition. I was fortunate enough to see him at the Midwest Fiesta in 2008 and was given one of these posters then (I had my art booth there marketing my art while I was working on the original of "Feather," which is an Andy stallion now available in bronze). I had no idea at the time that within a few months of that show, I'd have my very own half-Andalusian (El Paso Aricos, my dressage horse). Surprise surprise!
This is a picture of my handsome Ricos with my daughter, trainer Jennifer Truett of Dancing Horse Farm, Lebanon OH (www.dhf-oh.com) riding him. Since I mentioned him in reference to that IALHA poster, I thought I'd include his picture here. I like this picture so much, I use it as my desktop.
Back to the sculpture: Don't worry about the rider's face - right now her facial features are more "markers" than anything else. She doesn't look like herself at all yet! Her face is even a bit mashed because I grabbed her head and changed the angle of her neck and head from the side (they were too far back). Her arms and hands haven't been worked on at all yet. I'll get to them, don't worry!
A lot of sculpting (the way I do it, anyway!) seems to be "take two steps forward, three steps back" at times. As I work around the piece, I may find that something that looked and measured right before is now too long or too short in relation to some other part and the reference material. Just by bending one leg of the rider down so it laid properly along the horse's side changed the way it looked lengthwise, so I had to make some adjustments. That kind of thing happens frequently. Just one of the many challenges of 3-D work!
The little lump of clay on the horse's neck is a sign of my eagerness to get to the mane and tail. They're some of the last things I do on a sculpture, but they're also FUN so I'm eager to get to them. But it's too soon, so I was just messing around and left it there.
I'm pleased with the progress so far. Yay!
Saturday, May 22, 2010
Details, details, details . . .
Now I'm at the point of building the saddle on the horse and making sure it fits the rider. The rider is nowhere near perfect yet, but she's about as thick as she's going to be front to back (this is a petite middle-aged rider). I may need to adjust the length of her legs once I get back to work on her, but for now, I'm just getting the saddle assembled and placed where it should be. I know I need to get her body more proportionate and to get her sitting on her seat bones. I'll get there eventually.
At first, I had the saddle a bit long for this rider - If you look carefully, you should be able to see I've just cut the clay at the back of the cantle so it fits the rider better. I've just turned a bit of clay over to fill in some of the seat behind her, actually, and then put a cut behind the cantle as a marker for when I get back to work on it.
You can also see I've put feathers on three of the legs now, and those legs have also developed muscles, bones and tendons. I've put a bit of clay on the neck as well, starting to plan out the movement of the mane. The strips of clay ahead of where the saddle's knee rolls should be in the picture below are just extra pieces I haven't trimmed off yet. I've only developed the saddle on the left side and a bit on top. The right side will be done tomorrow.
Here are some detail shots of the horse and rider.
Don't worry, her ankles and feet will be straight with no wire sticking out of them when I get finished. For now, this is very much a work in progress. The knee rolls are just being developed and will be shaped better before I declare a victory over them.
I'm pretty pleased with how it's coming along. Hope you enjoy seeing its progress!
At first, I had the saddle a bit long for this rider - If you look carefully, you should be able to see I've just cut the clay at the back of the cantle so it fits the rider better. I've just turned a bit of clay over to fill in some of the seat behind her, actually, and then put a cut behind the cantle as a marker for when I get back to work on it.
You can also see I've put feathers on three of the legs now, and those legs have also developed muscles, bones and tendons. I've put a bit of clay on the neck as well, starting to plan out the movement of the mane. The strips of clay ahead of where the saddle's knee rolls should be in the picture below are just extra pieces I haven't trimmed off yet. I've only developed the saddle on the left side and a bit on top. The right side will be done tomorrow.
Here are some detail shots of the horse and rider.
Don't worry, her ankles and feet will be straight with no wire sticking out of them when I get finished. For now, this is very much a work in progress. The knee rolls are just being developed and will be shaped better before I declare a victory over them.
I'm pretty pleased with how it's coming along. Hope you enjoy seeing its progress!
Wednesday, May 12, 2010
Resetting the leg and repairing the shoulder
Continuing my saga of "Tolt's" leg repositioning. I removed the wax from the shoulder area (a lot harder to do than it sounds - I'd put it in there REALLY well!) and broke the wax off the wire for the shoulder part of the leg.(The wax you can see here is on part of the armature. It will anchor the wax I'm going to use for the shoulder.)
Then I cleaned all the clay off that wax that I could and dropped it into the pan to be softened so I could reapply it.
WARNING!!! Working with melted wax is DANGEROUS! You can be severely burned if you're not careful! Don't say I didn't warn you!
I didn't need the wax to be melted, just softened, so I watched it carefully as it "cooked." I had the electric griddle set to about 200 degrees so it would soften quickly (I'm not the most patient person in the world). I turned it over every so often so it would soften on both sides. When it was as soft as I wanted it, I scooped up a portion and put it in the shoulder cavity, which I had dug deeper so the leg would be set in a bit more than it had been before. Then I pressed the wire in place, made sure it was straight to the horse's body and packed more softened wax on top of the wire. I pressed wax around the wire until the wax cooled too much to maneuver anymore to make sure the wire was strongly set.
The little knob of clay at the bottom of that leg isn't the basis of the hoof - it's actually part of the ground. Its function is to give the wire a strong anchor to the working surface. It will be surrounded and covered by clay as I build up the ground and the hoof for that leg (as shown below).
I added clay over the wax, rebuilt the shoulder and reattached the clay from the leg to the horse's body. I haven't done any muscle detail yet, and it probably needs a little more clay to be added, but here's the finished repair.
WARNING!!! Working with melted wax is DANGEROUS! You can be severely burned if you're not careful! Don't say I didn't warn you!
I didn't need the wax to be melted, just softened, so I watched it carefully as it "cooked." I had the electric griddle set to about 200 degrees so it would soften quickly (I'm not the most patient person in the world). I turned it over every so often so it would soften on both sides. When it was as soft as I wanted it, I scooped up a portion and put it in the shoulder cavity, which I had dug deeper so the leg would be set in a bit more than it had been before. Then I pressed the wire in place, made sure it was straight to the horse's body and packed more softened wax on top of the wire. I pressed wax around the wire until the wax cooled too much to maneuver anymore to make sure the wire was strongly set.
The little knob of clay at the bottom of that leg isn't the basis of the hoof - it's actually part of the ground. Its function is to give the wire a strong anchor to the working surface. It will be surrounded and covered by clay as I build up the ground and the hoof for that leg (as shown below).
I added clay over the wax, rebuilt the shoulder and reattached the clay from the leg to the horse's body. I haven't done any muscle detail yet, and it probably needs a little more clay to be added, but here's the finished repair.
If you noticed the thin band of clay around each coronary band, those are there so I can put hair on the coronary band. They will be textured and the clay blended in to the pastern so you'd never know I had a "worm" of clay around each hoof once upon a time. :)
The repair went well and didn't take too long because I thought it all out before I started (always a good plan!) Moving the leg forward that small amount (about 1/8-1/4 inch) made a huge difference. I'm happy with it now. Onward!
Tuesday, May 11, 2010
Just when you think you're making great progress . . .
*sigh* I was going like gangbusters on "Tolt" (not "Tolte" as I've been spelling it - my customer corrected me. :)) and thought I was getting close to where I can start making it look more finished when something that had been niggling at the back of my mind reached up and slapped me in the face. Well, figuratively speaking, anyway. I didn't like the way the right front leg was set for some reason, and today I figured out why. It's too far back. *sigh* I'll have to rip it out and re-insert it and rebuild all the muscles again. Argh . . .
Other progress on it: The head is nearly finished except for the ears and the bones behind and the eye sockets, so I added the beard today. Icelandics, like many cold-country horses, have beards and feathers, and the customer wants the beard included on the piece. I've done lots of horses with feathers before (mostly Friesians), but never one with a beard like this. It took me a while to get it to look the way I wanted it to. It still needs a bit of work, but I'm fairly well satisfied with it.
The back legs need more detailing in the tendons and so on, but the hooves, pasterns and fetlocks look good, so I put the feathers in place to see how I liked them (sometimes I put them in and then take them off or revise them a LOT before I get them the way I want them). These aren't too bad.
I realized the heartgirth (depth of the body) was too deep, so I trimmed down the neck, withers and the part of the back where the saddle sits, and then it was right. Then I worked on the muscling in the neck. The problem I'm having with the muscling on this horse is that she's not built like the breeds I do most often (warmblood, Quarter Horse, Thoroughbred). Her coat and skin are thicker than any of those breeds and the muscling isn't as distinct. (Thicker skin means the tendons don't show as much and the few blood vessels that show aren't prominent.) I've been sculpting what muscling I know must be there, since it doesn't show in any of the reference pics I have of this horse or others of her breed, and then smoothing them down so they aren't as distinct. I think that's going to work well for this piece.
One thing sculptors do fairly often but painters rarely do (to my knowledge) is to work from lots of reference photos of other horses of the same breed in order put the subject in a different pose than we were able to photograph. In this case, I saw the mare trot but not tolt. I revise poses fairly often, but it's easier to do with breeds I'm familiar with. None of the reference photos I have of Icelandics tolting are well-lit enough for me to see any detail in their legs, which is frustrating to me. I'll get it, it's just a lot harder than I'd like it to be to get it right.
Painters are dependent on the light on their subject, so they will usually paint from a photo that has the pose and lighting the way they want their painting to be. They may do something different with the background, or may add or subtract foreground or background subjects, but whatever is included in the painting has to be lit the same way. That isn't the case with sculpture. We sculptors need to see the subject from all sides in the same position, which often means using reference pics of other horses to be able to see the muscling properly on all sides. None of the pics I have of the horses in that gait are high def or well-lit or crisp enough for my satisfaction, but I'll figure something out. If all else fails, I'll go visit the Icelandic farm in our area and take my own pictures - or at least run my hands over the horses' legs. My hands "see" the sculpture in ways my eyes can't, so running my hands over a horse like the one I'm sculpting is often quite useful.
As for this leg that's set too far back, I've dug it most of the way out now and will have to soften some wax in the morning so I can put it back in the right place. It will be a pain to bring it up to the level of completion it was, but it's better to fix it now than to see it in the bronze with that leg set too far back! Argh . . . Yeah, it's progress - three steps forward, four steps back - but still, it IS progress . . .
Other progress on it: The head is nearly finished except for the ears and the bones behind and the eye sockets, so I added the beard today. Icelandics, like many cold-country horses, have beards and feathers, and the customer wants the beard included on the piece. I've done lots of horses with feathers before (mostly Friesians), but never one with a beard like this. It took me a while to get it to look the way I wanted it to. It still needs a bit of work, but I'm fairly well satisfied with it.
The back legs need more detailing in the tendons and so on, but the hooves, pasterns and fetlocks look good, so I put the feathers in place to see how I liked them (sometimes I put them in and then take them off or revise them a LOT before I get them the way I want them). These aren't too bad.
I realized the heartgirth (depth of the body) was too deep, so I trimmed down the neck, withers and the part of the back where the saddle sits, and then it was right. Then I worked on the muscling in the neck. The problem I'm having with the muscling on this horse is that she's not built like the breeds I do most often (warmblood, Quarter Horse, Thoroughbred). Her coat and skin are thicker than any of those breeds and the muscling isn't as distinct. (Thicker skin means the tendons don't show as much and the few blood vessels that show aren't prominent.) I've been sculpting what muscling I know must be there, since it doesn't show in any of the reference pics I have of this horse or others of her breed, and then smoothing them down so they aren't as distinct. I think that's going to work well for this piece.
One thing sculptors do fairly often but painters rarely do (to my knowledge) is to work from lots of reference photos of other horses of the same breed in order put the subject in a different pose than we were able to photograph. In this case, I saw the mare trot but not tolt. I revise poses fairly often, but it's easier to do with breeds I'm familiar with. None of the reference photos I have of Icelandics tolting are well-lit enough for me to see any detail in their legs, which is frustrating to me. I'll get it, it's just a lot harder than I'd like it to be to get it right.
Painters are dependent on the light on their subject, so they will usually paint from a photo that has the pose and lighting the way they want their painting to be. They may do something different with the background, or may add or subtract foreground or background subjects, but whatever is included in the painting has to be lit the same way. That isn't the case with sculpture. We sculptors need to see the subject from all sides in the same position, which often means using reference pics of other horses to be able to see the muscling properly on all sides. None of the pics I have of the horses in that gait are high def or well-lit or crisp enough for my satisfaction, but I'll figure something out. If all else fails, I'll go visit the Icelandic farm in our area and take my own pictures - or at least run my hands over the horses' legs. My hands "see" the sculpture in ways my eyes can't, so running my hands over a horse like the one I'm sculpting is often quite useful.
As for this leg that's set too far back, I've dug it most of the way out now and will have to soften some wax in the morning so I can put it back in the right place. It will be a pain to bring it up to the level of completion it was, but it's better to fix it now than to see it in the bronze with that leg set too far back! Argh . . . Yeah, it's progress - three steps forward, four steps back - but still, it IS progress . . .
Monday, April 19, 2010
Shipping Two-Dimensional Art
One of the biggest headaches (and heartaches) I have when I put on the Dancing Horse Farm Art Show is dealing with art that arrives poorly packed. Today I spent the afternoon at DHF staring at some damaged paintings that probably wouldn't have been damaged if they'd been packed properly. I've written articles and blog posts about the proper packing of art before, but it seems the message still hasn't gotten across to everyone, so here I go again.
Many shows won't allow glass on artworks. I've been told that pastel artists prefer glass to Plexiglas because Plexi can develop static and pull pastel dust from the painting onto the inside surface of the Plexi. If you can ship your art without glass, please do so! If you must use glass (and if the art show allows it), many artists put a masking tape "X" on the glass to try to protect it from shattering. (With the tape in place, if it does shatter, it may not break in as many pieces and may not damage the painting.) If you use Plexi, leave the blue plastic film on the face of it to avoid scratches in shipping.
Sandwich (one piece in front, one piece in back) your frame in either thick cardboard or Styrofoam board. You can connect the two pieces of board with masking tape to make it easier for the art show personnel to take it apart and reassemble it.
If you use cardboard to protect your work, wrap the entire "sandwich" in bubble wrap. The bubble wrap MUST be wrapped thickly enough that you can no longer feel any corners or sharp edges! If you can feel an edge or a corner, that edge or corner is not well enough protected. Even if you use cardboard corners to protect your frame, it is not protected enough unless the face of the painting (or its glass), the back of the frame, the corners and all sides of the frame are protected by thick enough wrapping that you can't feel any edges at all. That usually means at least six layers of bubble. If you use small bubble, it will take more layers, if you use large bubbles, you may get away with less, but more cushioning is better than less.
Once you have the glass protected and your painting well-wrapped, slide it into a box made of heavy enough cardboard that the sides can't be pushed in by hand pressure. You may want to line the box with more layers of cardboard or Styrofoam board.
If you think I'm being overprotective, you should be aware that UPS standards say if a package isn't cushioned well enough to survive a 4-foot drop to concrete, they won't pay the insurance claim. That's a good standard to use for all shipping.
You may think your painting is well-packed now. Nope! Now it's time to get a larger box and line it with Styrofoam boards - NOT PEANUTS! Many shows, including mine, will not accept work shipped in peanuts unless the peanuts are confined to plastic bags. The box you just packed will be slid into the larger box lined with Styrofoam or BAGGED peanuts, and THEN, dear friends, your art is well packed - well, it will be when you close the box. Be sure and mark "Open Here" if it matters which end should be opened first.
There is a much better and easier way to ship two-dimensional art than what I described above. Art Float boxes (http://www.airfloatsys.com/shop/index.php?main_page=index&cPath=1) are as strong as plywood boxes, but lighter weight, and have sponge foam fitted inside it which you can adjust to fit different paintings. These boxes are well worth their cost and can be used over and over and over. They can't be easily punctured like most cardboard boxes and they really are lightweight especially considering the amount of protection they give your work. Trust me, art show workers LOVE to see this kind of packaging! It's easy to unpack and easy to pack - wonderful!
I have received shipped work with one thin, limp strip of bubble wrap just loosely wrapped around the painting in a single box with no other packing. Guess what happened to the painting? Yup, serious damage. I have received shipped work wrapped in blankets, in a box stuffed with chunks of sponge foam. Those paintings were fine but it was heck trying to repack them to return it after the show. I have received paintings where the artist trusted UPS to pack them right. Yes, the art arrived intact, but when I opened the box, loose peanuts exploded all over the room. It was a nightmare to clean up and a nightmare to repack it and it frustrated me and took way more time than it should have.
PLEASE be kind to those who have to unpack and repack your art. And please, be kind to the art you spent hours and hours planning and creating. Protect it like you would your children -send it off safely in packaging that will be easy for the folks at the other end to use to return it if it doesn't sell. They and and your art will all be better off for it.
Many shows won't allow glass on artworks. I've been told that pastel artists prefer glass to Plexiglas because Plexi can develop static and pull pastel dust from the painting onto the inside surface of the Plexi. If you can ship your art without glass, please do so! If you must use glass (and if the art show allows it), many artists put a masking tape "X" on the glass to try to protect it from shattering. (With the tape in place, if it does shatter, it may not break in as many pieces and may not damage the painting.) If you use Plexi, leave the blue plastic film on the face of it to avoid scratches in shipping.
Sandwich (one piece in front, one piece in back) your frame in either thick cardboard or Styrofoam board. You can connect the two pieces of board with masking tape to make it easier for the art show personnel to take it apart and reassemble it.
If you use cardboard to protect your work, wrap the entire "sandwich" in bubble wrap. The bubble wrap MUST be wrapped thickly enough that you can no longer feel any corners or sharp edges! If you can feel an edge or a corner, that edge or corner is not well enough protected. Even if you use cardboard corners to protect your frame, it is not protected enough unless the face of the painting (or its glass), the back of the frame, the corners and all sides of the frame are protected by thick enough wrapping that you can't feel any edges at all. That usually means at least six layers of bubble. If you use small bubble, it will take more layers, if you use large bubbles, you may get away with less, but more cushioning is better than less.
Once you have the glass protected and your painting well-wrapped, slide it into a box made of heavy enough cardboard that the sides can't be pushed in by hand pressure. You may want to line the box with more layers of cardboard or Styrofoam board.
If you think I'm being overprotective, you should be aware that UPS standards say if a package isn't cushioned well enough to survive a 4-foot drop to concrete, they won't pay the insurance claim. That's a good standard to use for all shipping.
You may think your painting is well-packed now. Nope! Now it's time to get a larger box and line it with Styrofoam boards - NOT PEANUTS! Many shows, including mine, will not accept work shipped in peanuts unless the peanuts are confined to plastic bags. The box you just packed will be slid into the larger box lined with Styrofoam or BAGGED peanuts, and THEN, dear friends, your art is well packed - well, it will be when you close the box. Be sure and mark "Open Here" if it matters which end should be opened first.
There is a much better and easier way to ship two-dimensional art than what I described above. Art Float boxes (http://www.airfloatsys.com/shop/index.php?main_page=index&cPath=1) are as strong as plywood boxes, but lighter weight, and have sponge foam fitted inside it which you can adjust to fit different paintings. These boxes are well worth their cost and can be used over and over and over. They can't be easily punctured like most cardboard boxes and they really are lightweight especially considering the amount of protection they give your work. Trust me, art show workers LOVE to see this kind of packaging! It's easy to unpack and easy to pack - wonderful!
I have received shipped work with one thin, limp strip of bubble wrap just loosely wrapped around the painting in a single box with no other packing. Guess what happened to the painting? Yup, serious damage. I have received shipped work wrapped in blankets, in a box stuffed with chunks of sponge foam. Those paintings were fine but it was heck trying to repack them to return it after the show. I have received paintings where the artist trusted UPS to pack them right. Yes, the art arrived intact, but when I opened the box, loose peanuts exploded all over the room. It was a nightmare to clean up and a nightmare to repack it and it frustrated me and took way more time than it should have.
PLEASE be kind to those who have to unpack and repack your art. And please, be kind to the art you spent hours and hours planning and creating. Protect it like you would your children -send it off safely in packaging that will be easy for the folks at the other end to use to return it if it doesn't sell. They and and your art will all be better off for it.
Saturday, March 13, 2010
Trying Something New
I'm an equine artist, but I sometimes want a change of pace and do something different. ("Tolte" isn't finished, but will be worked on at Equine Affaire - I'm saving some of the work for then. More pictures after that!)
A friend of mine (Holly McCullough, www.momandmereborns.com) makes those baby dolls that look like real babies. The process of doing this - painting the delicate skin tones, the veins beneath the skin's surface, rooting mohair for the baby's hair, etc. - is what Holly does. She buys the sculpts to "reborn." She asked me if I'd ever considered sculpting dolls. Well, no, but I am interested in figurative sculpting, so I decided to give it a try.
There are various ways to make the doll heads. You can buy a sculpting form from www.secristdolls.com to which you add full round eyes (as opposed to flat-back eyes) and polymer clay like Super Sculpy (which is what I used for this one). They have an instructional DVD which I found very helpful, but as I worked, I decided they must have left out some information. They say to put two layers of clay on the form and just push that around to get the features you want. But their form isn't shaped like a baby's head, IMO. The back is too flat and the forehead slopes too much. I had to add four layers of clay to bring the forehead up to the rounded look I love in babies. I also had to put four layers of clay on the cheeks to get them pudgy at all.
I think the chin is too far forward too - a baby's face, as I recall and as my research so far shows me, kind of falls away there, with the chin being farther back than the nose more than my doll's is here. The ear looks big, but it fits the size of what they had on the sculpt as the ear locator.
I'm not that happy with his face. Sculpting squinchy eyes is hard for me - I'm used to doing big, open, soft eyes but little babies eyes aren't like that. I may have too much depth in his eye sockets, I'm not sure. He's CLOSE to done, but even if he is and I bake him this way (well, after I finish smoothing him), I'm not satisfied with him. I think the sculpting form restricted me too much. The next doll I do will be done on a styrofoam form that has no details, just a kind of shelf where the eyes go and then a pudgy place below that. It's small enough that I'll have to add a lot of clay to it, I think, before it will be big enough. But in those layers of clay, I will have the freedom to build the face and head the way I see them. Hopefully then I'll like the resulting baby better. When that kind of sculpting form is baked, it shrinks to a nugget inside the head. I got those from www.hunnybunsrebornsupply.com owned by Stephanie Sullivan. She has everything you need to make doll sculpts or do reborning, and she's local, so I had a lovely time talking to her! If you get the Secrist DVD, you'll see one of her sculpts near the very end. I'll post pics of the new baby when I get it done.
I know these babies will look a LOT different after Holly "reborns" them - I'm looking forward to seeing how they turn out!
The best thing is - this has been quite a challenge for me and has tested my sculpting skills in ways they haven't been in years. That's FUN for me!!
A friend of mine (Holly McCullough, www.momandmereborns.com) makes those baby dolls that look like real babies. The process of doing this - painting the delicate skin tones, the veins beneath the skin's surface, rooting mohair for the baby's hair, etc. - is what Holly does. She buys the sculpts to "reborn." She asked me if I'd ever considered sculpting dolls. Well, no, but I am interested in figurative sculpting, so I decided to give it a try.
There are various ways to make the doll heads. You can buy a sculpting form from www.secristdolls.com to which you add full round eyes (as opposed to flat-back eyes) and polymer clay like Super Sculpy (which is what I used for this one). They have an instructional DVD which I found very helpful, but as I worked, I decided they must have left out some information. They say to put two layers of clay on the form and just push that around to get the features you want. But their form isn't shaped like a baby's head, IMO. The back is too flat and the forehead slopes too much. I had to add four layers of clay to bring the forehead up to the rounded look I love in babies. I also had to put four layers of clay on the cheeks to get them pudgy at all.
I think the chin is too far forward too - a baby's face, as I recall and as my research so far shows me, kind of falls away there, with the chin being farther back than the nose more than my doll's is here. The ear looks big, but it fits the size of what they had on the sculpt as the ear locator.
I'm not that happy with his face. Sculpting squinchy eyes is hard for me - I'm used to doing big, open, soft eyes but little babies eyes aren't like that. I may have too much depth in his eye sockets, I'm not sure. He's CLOSE to done, but even if he is and I bake him this way (well, after I finish smoothing him), I'm not satisfied with him. I think the sculpting form restricted me too much. The next doll I do will be done on a styrofoam form that has no details, just a kind of shelf where the eyes go and then a pudgy place below that. It's small enough that I'll have to add a lot of clay to it, I think, before it will be big enough. But in those layers of clay, I will have the freedom to build the face and head the way I see them. Hopefully then I'll like the resulting baby better. When that kind of sculpting form is baked, it shrinks to a nugget inside the head. I got those from www.hunnybunsrebornsupply.com owned by Stephanie Sullivan. She has everything you need to make doll sculpts or do reborning, and she's local, so I had a lovely time talking to her! If you get the Secrist DVD, you'll see one of her sculpts near the very end. I'll post pics of the new baby when I get it done.
I know these babies will look a LOT different after Holly "reborns" them - I'm looking forward to seeing how they turn out!
The best thing is - this has been quite a challenge for me and has tested my sculpting skills in ways they haven't been in years. That's FUN for me!!
Tuesday, February 16, 2010
The Blood-Red Pencil: Ask the Editor: Strong Female Characters
This is a great article by my friend, Helen Ginger, a strong female character herself! Enjoy!
Monday, February 15, 2010
Percy Jackson vs. Harry Potter
We went to see "The Lightning Thief" last week (http://www.percyjacksonthemovie.com/), the first of the Percy Jackson books to make it to film. I haven't read the books, so this post is going to be comparing the Percy Jackson film to the Harry Potter films (http://harrypotter.warnerbros.com especially the first two HP films which were directed by the "Percy Jackson" director, Chris Columbus). I won't be comparing films to books or books to books.
My husband hasn't read any Harry Potter books nor has he read the Percy Jackson books. He's not much of a fan of fantasy, honestly. But on our way home from the film, we were struck by the differences between Harry and Percy, their strengths and weaknesses and other characteristics. Percy came up short in every way.
The hero in a film, novel or story has to capture your imagination, be sympathetic, charming and likable in various ways even if he's not a totally nice guy. The depth of his character development will depend on if the story or film is character-driven or story-driven. In Harry's case, although his stories are adventures and full of action, the center of interest for the story is Harry himself, his character, his goodness of heart (even if he does break the rules every so often, he's a good kid), the serious way he looks at his life, his "saving people thing." In Percy's case, the adventure is the thing, and not much is done to develop his character.
While both boys have adventures (well, in Harry's case, it's more of a mystery than an adventure at first) starting at the beginning of their films, the emphasis isn't the same and the results are hugely different. Do we care about Harry? Absolutely. Do we care about Percy? Not that much. Why the difference?
In Harry's case, he's a genuinely nice boy who's kind, generous and protective of his friends. Percy seems like a nice enough kid, and he's kind and generous too, but he also has no qualms at all about killing someone, and when he loses someone close to him, his pain is so brief, you wonder how much pain he actually felt.
Harry has a melancholy nature because he lost his parents when he was a baby and grew up with horrible relatives. Percy isn't melancholy, but he is somewhat rebellious. Of course, we meet him when he's a teenager, not a young boy like Harry, and Percy has his mom, who he loves, and a horrible stepfather. One of the things I noticed about Percy early on was that his rages, rebellion and everything else are mild compared to those of many teenagers. He doesn't seem to feel anything to any extreme, certainly not as much as Harry does.
Percy hasn't been beaten down throughout his childhood the way Harry was. Harry's a survivor with a strong moral compass. He got through his childhood on his own, with no outside help, and he has a good sense of right and wrong despite the way he was treated by his relatives. He has depths to his personality that just doesn't show in Percy.
Percy's had plenty to eat, a relatively normal childhood (he takes the usual classes, although he does have a learning disability, and seems to have friends at school, unlike pre-Hogwarts Harry; he has clothes that fit him; there's no "Dudley" to make his home and school life hellish). Percy's had a protector all his life (his best friend) as well as his mom. The only real hardship he's had to deal with is his stepfather. Yet of the Percy's the one with the "I'll do whatever it takes" attitude from the beginning of his adventure that includes breaking all kinds of laws, no remorse about damaging property, stealing things, or injuring other people. You might expect Harry, who's been abused all his life, to have that kind of attitude, but the only "I'll do whatever it takes" attitude we see out of Harry is when his "saving people thing" kicks in. He will do whatever it takes to rescue someone, even at the cost of his own life, and it doesn't take Harry long at all to decide to jump into such situations.
Harry will do the very best he can in adversity, but he will also hope for help since he feels inadequately prepared to deal with the dangers facing him. Despite his lack of training, he always rises to the occasion. He succeeds with the help of his friends, but also because of his own courage and good character. Percy has a demi-goddess as a sidekick and another "super-friend" helping him, but there's more of an "I did this" feeling to Percy than there is to Harry, who always credits his friends for their help, even if what they did seems minimal to the rest of us in comparison to Harry's efforts.
Harry's modest about what he can do and embarrassed when someone praises him. Percy seems to take such things in stride, and not just because he's a teenager. When Harry's Percy's age (in the later films), he's still modest about his accomplishments and still says he had "a lot of help" while in truth, it was nearly all Harry's great courage, power and sheer luck that got him through the crisis.
These films are fantasy, yup, but Harry's films show him learning how to do what he needs to do, while Percy, who's a demi-god (half-human son of Poseidon) picks up a sword and immediately knows how to beat other more experienced people his age in training. Harry has to learn how to use his powers and how to analyze situations so he can deal with them. Percy just goes from high school kid with learning disabilities to demi-god hero without having to learn any skills to speak of and with no real mishaps on the way to becoming skilled. He gets some weapons and is instantly the master of them.
Perhaps the difference between them is that Harry is human and Percy is a demi-god but I prefer Harry's humanity. It's obvious that he cares when his friends are hurt. Harry's scared to death yet faces danger bravely despite the full knowledge that he's very likely to die from the danger he's about to deal with. Percy sort of stumbles through things but never seems to be scared, and he laughs when he survives a battle, unlike Harry who suffers through his recovery both emotionally and physically. Harry gets hurt in battle, Percy doesn't.
Being a demi-god doesn't mean Percy can't be killed, yet he never seems that afraid of what he's getting into. Nor do we see him plucking up his courage the way we do Harry. Percy just jumps headlong in to whatever he's about to do. Harry dreads what he has to do, but faces the worst with grim determination despite his fear. Harry is human. Harry's much more heroic and a far more complex character than Percy.
The Percy Jackson film and the first two Potter films were all directed by Chris Columbus. I don't think Columbus slacked off in his direction of an experienced teenage actor (Logan Lerman, who plays Percy) versus his direction of Daniel Radcliffe as Harry, who was many years younger than Logan and a much less experienced actor at the time. I think it must be the writing of the characters themselves that's the difference.
Even in the first HP film, Harry has a depth of character that Percy just doesn't exhibit. He's horrified to have killed Professor Quirrell, despite the fact that he was fighting for his life. Percy gives his most serious opponent a moment to decide if he's going to surrender or not, but when he doesn't, Percy does away with him with no apparent remorse but more of a "good riddance" attitude. Yes, Harry was a young boy when he killed Quirrell, but even in the later films when he's around Percy's age, while Harry is determined to kill his enemies, you can tell that it costs him something to even contemplate it.
Remember, I'm not talking about the books here, since I haven't read any of the Percy Jackson books. But based on the films, Harry at any age we've seen so far is more sensitive and has a wider emotional range than Percy. Harry's rages are harsher than Percy's and his joy is more palpable as well.
Harry normally doesn't kill without remorse, although when he kills Voldemort, he won't be sorry he killed them. There will be a cost to his spirit and we will see that. And remember, Harry doesn't use the Unforgivable Curses properly because he isn't a cruel enough person to manage it. Harry tries to disarm his opponents rather than kill them. He uses "Expelliarmus" instead of "Avada Kedavra."
Percy deliberately uses lethal force, knowing exactly what the consequences will be. Percy also doesn't seem to be that bothered by killing someone he thought was a friend at first. It's his lack of remorse, his lack of moral depth that bothers me and led to this blog post. It's also what prompted my husband, who cares very little about fantasy, to talk about it on the way home from the film.
Could the difference between Harry and Percy be in the skills of the actors portraying them? Possibly, but Logan is a very experienced actor, one who's been nominated for a lot of awards and won three (I checked www.imdb.com). Daniel is a gifted actor (nominated for a lot of awards and won 19 so far) who was so well-cast as Harry that he didn't need a lot of experience to play him well as he honed his acting skills. Dan's growing skills have added layers of complexity to his portrayal of Harry, but still, I think the basic morality of the characters is based in the writing, not in the acting or directing.
When you're creating characters in your writing, I try to give them depth as well as a lot of action. When I read, watch TV or films, or write my own fiction, I want to see complex characters who are torn by the things they have to do to deal with the adventures facing them. Some people prefer to write action with very little character development, but to me, a more entertaining story is where I see how the action reveals and develops the character of those involved.
Will I see more Percy Jackson films? I don't honestly know - perhaps I will. But I will definitely see the last two HP films. I'm looking forward to seeing how Dan will play the darkest scenes in Harry's life. I'm sure it will be a rich and layered portrait of a good man who has more required of him than anyone should ask. I think Logan is probably capable of greater things but he needs better material to work with. It will be intersting to see both of these young actors mature and develop their craft.
I wish them both lots of excellent scripts and talented directors and co-stars. And I'll continue to work hard to create richly layered characters with great moral depths in my writing, as well as great adventures.
My husband hasn't read any Harry Potter books nor has he read the Percy Jackson books. He's not much of a fan of fantasy, honestly. But on our way home from the film, we were struck by the differences between Harry and Percy, their strengths and weaknesses and other characteristics. Percy came up short in every way.
The hero in a film, novel or story has to capture your imagination, be sympathetic, charming and likable in various ways even if he's not a totally nice guy. The depth of his character development will depend on if the story or film is character-driven or story-driven. In Harry's case, although his stories are adventures and full of action, the center of interest for the story is Harry himself, his character, his goodness of heart (even if he does break the rules every so often, he's a good kid), the serious way he looks at his life, his "saving people thing." In Percy's case, the adventure is the thing, and not much is done to develop his character.
While both boys have adventures (well, in Harry's case, it's more of a mystery than an adventure at first) starting at the beginning of their films, the emphasis isn't the same and the results are hugely different. Do we care about Harry? Absolutely. Do we care about Percy? Not that much. Why the difference?
In Harry's case, he's a genuinely nice boy who's kind, generous and protective of his friends. Percy seems like a nice enough kid, and he's kind and generous too, but he also has no qualms at all about killing someone, and when he loses someone close to him, his pain is so brief, you wonder how much pain he actually felt.
Harry has a melancholy nature because he lost his parents when he was a baby and grew up with horrible relatives. Percy isn't melancholy, but he is somewhat rebellious. Of course, we meet him when he's a teenager, not a young boy like Harry, and Percy has his mom, who he loves, and a horrible stepfather. One of the things I noticed about Percy early on was that his rages, rebellion and everything else are mild compared to those of many teenagers. He doesn't seem to feel anything to any extreme, certainly not as much as Harry does.
Percy hasn't been beaten down throughout his childhood the way Harry was. Harry's a survivor with a strong moral compass. He got through his childhood on his own, with no outside help, and he has a good sense of right and wrong despite the way he was treated by his relatives. He has depths to his personality that just doesn't show in Percy.
Percy's had plenty to eat, a relatively normal childhood (he takes the usual classes, although he does have a learning disability, and seems to have friends at school, unlike pre-Hogwarts Harry; he has clothes that fit him; there's no "Dudley" to make his home and school life hellish). Percy's had a protector all his life (his best friend) as well as his mom. The only real hardship he's had to deal with is his stepfather. Yet of the Percy's the one with the "I'll do whatever it takes" attitude from the beginning of his adventure that includes breaking all kinds of laws, no remorse about damaging property, stealing things, or injuring other people. You might expect Harry, who's been abused all his life, to have that kind of attitude, but the only "I'll do whatever it takes" attitude we see out of Harry is when his "saving people thing" kicks in. He will do whatever it takes to rescue someone, even at the cost of his own life, and it doesn't take Harry long at all to decide to jump into such situations.
Harry will do the very best he can in adversity, but he will also hope for help since he feels inadequately prepared to deal with the dangers facing him. Despite his lack of training, he always rises to the occasion. He succeeds with the help of his friends, but also because of his own courage and good character. Percy has a demi-goddess as a sidekick and another "super-friend" helping him, but there's more of an "I did this" feeling to Percy than there is to Harry, who always credits his friends for their help, even if what they did seems minimal to the rest of us in comparison to Harry's efforts.
Harry's modest about what he can do and embarrassed when someone praises him. Percy seems to take such things in stride, and not just because he's a teenager. When Harry's Percy's age (in the later films), he's still modest about his accomplishments and still says he had "a lot of help" while in truth, it was nearly all Harry's great courage, power and sheer luck that got him through the crisis.
These films are fantasy, yup, but Harry's films show him learning how to do what he needs to do, while Percy, who's a demi-god (half-human son of Poseidon) picks up a sword and immediately knows how to beat other more experienced people his age in training. Harry has to learn how to use his powers and how to analyze situations so he can deal with them. Percy just goes from high school kid with learning disabilities to demi-god hero without having to learn any skills to speak of and with no real mishaps on the way to becoming skilled. He gets some weapons and is instantly the master of them.
Perhaps the difference between them is that Harry is human and Percy is a demi-god but I prefer Harry's humanity. It's obvious that he cares when his friends are hurt. Harry's scared to death yet faces danger bravely despite the full knowledge that he's very likely to die from the danger he's about to deal with. Percy sort of stumbles through things but never seems to be scared, and he laughs when he survives a battle, unlike Harry who suffers through his recovery both emotionally and physically. Harry gets hurt in battle, Percy doesn't.
Being a demi-god doesn't mean Percy can't be killed, yet he never seems that afraid of what he's getting into. Nor do we see him plucking up his courage the way we do Harry. Percy just jumps headlong in to whatever he's about to do. Harry dreads what he has to do, but faces the worst with grim determination despite his fear. Harry is human. Harry's much more heroic and a far more complex character than Percy.
The Percy Jackson film and the first two Potter films were all directed by Chris Columbus. I don't think Columbus slacked off in his direction of an experienced teenage actor (Logan Lerman, who plays Percy) versus his direction of Daniel Radcliffe as Harry, who was many years younger than Logan and a much less experienced actor at the time. I think it must be the writing of the characters themselves that's the difference.
Even in the first HP film, Harry has a depth of character that Percy just doesn't exhibit. He's horrified to have killed Professor Quirrell, despite the fact that he was fighting for his life. Percy gives his most serious opponent a moment to decide if he's going to surrender or not, but when he doesn't, Percy does away with him with no apparent remorse but more of a "good riddance" attitude. Yes, Harry was a young boy when he killed Quirrell, but even in the later films when he's around Percy's age, while Harry is determined to kill his enemies, you can tell that it costs him something to even contemplate it.
Remember, I'm not talking about the books here, since I haven't read any of the Percy Jackson books. But based on the films, Harry at any age we've seen so far is more sensitive and has a wider emotional range than Percy. Harry's rages are harsher than Percy's and his joy is more palpable as well.
Harry normally doesn't kill without remorse, although when he kills Voldemort, he won't be sorry he killed them. There will be a cost to his spirit and we will see that. And remember, Harry doesn't use the Unforgivable Curses properly because he isn't a cruel enough person to manage it. Harry tries to disarm his opponents rather than kill them. He uses "Expelliarmus" instead of "Avada Kedavra."
Percy deliberately uses lethal force, knowing exactly what the consequences will be. Percy also doesn't seem to be that bothered by killing someone he thought was a friend at first. It's his lack of remorse, his lack of moral depth that bothers me and led to this blog post. It's also what prompted my husband, who cares very little about fantasy, to talk about it on the way home from the film.
Could the difference between Harry and Percy be in the skills of the actors portraying them? Possibly, but Logan is a very experienced actor, one who's been nominated for a lot of awards and won three (I checked www.imdb.com). Daniel is a gifted actor (nominated for a lot of awards and won 19 so far) who was so well-cast as Harry that he didn't need a lot of experience to play him well as he honed his acting skills. Dan's growing skills have added layers of complexity to his portrayal of Harry, but still, I think the basic morality of the characters is based in the writing, not in the acting or directing.
When you're creating characters in your writing, I try to give them depth as well as a lot of action. When I read, watch TV or films, or write my own fiction, I want to see complex characters who are torn by the things they have to do to deal with the adventures facing them. Some people prefer to write action with very little character development, but to me, a more entertaining story is where I see how the action reveals and develops the character of those involved.
Will I see more Percy Jackson films? I don't honestly know - perhaps I will. But I will definitely see the last two HP films. I'm looking forward to seeing how Dan will play the darkest scenes in Harry's life. I'm sure it will be a rich and layered portrait of a good man who has more required of him than anyone should ask. I think Logan is probably capable of greater things but he needs better material to work with. It will be intersting to see both of these young actors mature and develop their craft.
I wish them both lots of excellent scripts and talented directors and co-stars. And I'll continue to work hard to create richly layered characters with great moral depths in my writing, as well as great adventures.
Wednesday, February 03, 2010
"Feather"
It's always fun when I get a new bronze from the foundry for the first time! I've just received "Feather" and it's wonderful to see how he turned out. He's 9" long x 8" high x 3 3/4" wide including the turned head and flying mane.
As you can see, he's available in both bay and silver. He was intended to be a Pegasus, but after cutting him apart four times to try various armatures for the wings, I decided any wings I put on him would vibrate too much in shipping and damage the horse. I had one bronze sent to me with no patina on it so I can make wings to fit it and mark where they go on the bronze. Hopefully doing it that way will work!
If you'd like to see pictures of "Feather" as a work in progress as well as pictures of him with his first set of wings, click here: "Feather"
Friday, January 29, 2010
Adding a Rider to the Icelandic Sculpture
While it is possible to build an armature for a horse and rider as one piece, I chose to do the rider separately so I can work on her detailing up close without the horse in the way.
As you can see, the horse has progressed a good bit since the last time I posted about her. Her right hind leg is close to finished as is her right shoulder. The bulk of her body is pretty much there, I just have to make sure all the depressions are tightly filled so the surface won't collapse if touched, carve away what isn't the horse I'm making and smooth everything out. Easy, right? Not when you're working this big! I'm used to being able to put my hands around the horse's barrel, warming the clay with my hands and smoothing it with my thumbs. This piece is simply too big to do that. I'm having to use a lamp and a hairdryer to warm the clay enough that I can smooth it with my hands. I can carve it down with the tools, but sculpting is in my hands, so I have to run both my fingers and palms over it to see if it feels right to me.
That's where we are for now! These are "pose approval" photos which I send to my customer for them to approve. If they like it, they'll send the second payment on the job. If they want something changed, this is the time for them to tell me or I'll have to charge them extra for the time it takes me to make the change. All of this is spelled out in my commission contracts.
As you can see, the horse has progressed a good bit since the last time I posted about her. Her right hind leg is close to finished as is her right shoulder. The bulk of her body is pretty much there, I just have to make sure all the depressions are tightly filled so the surface won't collapse if touched, carve away what isn't the horse I'm making and smooth everything out. Easy, right? Not when you're working this big! I'm used to being able to put my hands around the horse's barrel, warming the clay with my hands and smoothing it with my thumbs. This piece is simply too big to do that. I'm having to use a lamp and a hairdryer to warm the clay enough that I can smooth it with my hands. I can carve it down with the tools, but sculpting is in my hands, so I have to run both my fingers and palms over it to see if it feels right to me.
The horse has no saddle at the moment, but will by the time I've finished it. The rider's right leg isn't quite long enough yet and the foot isn't formed at all, but I'm just seeing how the horse and rider fit together here.
I need to build up the thickness of the rider's legs and arms so she'll be proportionate. She will have short hair and be wearing a helmet and Kentucky jods (breeches that are boot-cut so she can wear short boots) unless my customer decides she wants to be in different clothes. I can always add long sleeves if need be and change the style of her pants and boots.
As you can see, the horse's right side is more developed and the rider's left side is more developed. I have pictures of the rider's armature somewhere - maybe in my laptop. I'll post them when I figure out where I filed them!
The rider's eyeballs are made of harder clay in a different color so I can see what I'm doing when I shape the eyelids, browbone, etc. around them. The horse's dark eyes are either beads or earrings - I've forgotten now what I used. I like to use a hard spherical thing as the eyeball so I can build the eye socket properly and not get the eye out of round. That isn't possible for humans, since the pupil is cut out to make the eyes look alive. Horses have horizontal, sort of rectangular pupils, not round ones like we have, so their eyes are usually shown as just round, no pupils cut out.
The direction the horse is looking is shown by the angle of the upper eyelid and the position of the head, neck and ears. The direction a person is looking is shown by the location of the pupil and iris of the eye, with the pupil cut out (like a bowl, a rounded cut) and the iris either cut out more shallowly for dark eyes, or just scribed on the eyeball for light eyes (like blue eyes, such as my rider has). The direction a human's eyes are looking is also indicated by the highest arch of the eyelids, since the lens of the eyeball pushes the lid out a little bit. I haven't carved out my rider's pupils yet.
This face isn't really a likeness to my customer yet - it's more of a place holder while I get her proportions right. Once I'm happy with the rest of her, I'll detail the face so it looks like her, then add the hair and helmet. The line carved down the center of the horse's face is there to help me compare sides to make sure she's symmetrical.
Here I'm seeing if she's sitting straight, if her shoulders and knees match (not yet, although the shoulders are close), etc. I haven't worried about doing a likeness of the horse yet either. As you can see, her right eye is a bit low. I've already repositioned both eyes twice to get them at the right height for the size of this horse's head. Once I move the eye that's in the wrong position (I think that may be the horse's right eye, the one that we see on the left side of the photo), her face will be straight. Then I can detail her head, finish detailing her neck and the rest of her, and add her saddle. Her bridle will be added after I add the ears and before I add the massive amount of flying mane this mare's going to have. Getting things "straight" with each other is one of the hardest things about sculpting, in my opinion.
The rider has two prongs that come out where her seat bones would be located on a real person (dressage riders may chuckle at the idea of how easy it would be to "plug in" if you had such prongs coming out of your seat bones, LOL!). These prongs are inserted in the horse's back to hold her in place. When I've finished sculpting the rider and her saddle, I will mark the saddle to show where the rider should sit and will cut off the prongs. The rider will be sent as a separate piece, not as part of the horse. Since her armature isn't built as part of the main armature, she would come off the horse in transport if I shipped her mounted on the horse.
Can you tell that the rider's shoulders and head are just a wee bit off? The head is leaning a little bit to the left and the left shoulder is a little bit high. By "a little bit" I mean perhaps as little as 1/32nd of a difference. You'd be amazed how much of a change can be made by carving off a tiny bit of clay or moving something like an eyeball just a tiny bit. I use a mirror and photos I post on my computer to help me see where the errors are. Sometimes it's hard to see them when I'm looking at the real sculpture. The artist's eye at some point tends to see what they hope is there, not what's really there. I've heard this lots of times, mostly about painters, but it's true of sculptors too. Looking at it backwards (in a mirror), in a photo or even upside down is quite useful in helping you see with fresh eyes.
You can see the mare's frog, heel and hock on the right hind leg. That shows this leg is nearly done. A lot of the detail I put in the rear end of the horse will be hidden by the tail, just as a lot of the detail in the neck will be hidden by the mane, but I put it in there so I know it's correct before I add all that hair. I also need to add feathers to the legs and a beard to the horse's head and throatlatch. All of that comes much later.
I hope you're enjoying watching "Tolte" evolve from wires and pipes to a finished bronze!
Friday, January 08, 2010
Changing Writing Instruments Can Freshen Your Writing
In this month's meeting of the writing group I attend, the leader told us to get out our notebooks and pens and said we had to write for 20 minutes with no prompt at all. (For those who may not know, a "writing prompt" is a first line for a story, or a subject, or an idea to help you get started. For instance, a writing prompt might be, "I hate it when . . ." or "When I opened the door. . ." - something like that.)
It can be very hard to come up with something to write about in a short time like that. Some in the group worked on articles or stories they were already working on while others made up either fiction or non-fiction.
I had no idea what to write, but as soon as he told us to start, three words popped into my head: Ping. Ping. Ping. It was a sound - like a fingernail tapping on glass or the beeping signal from a machine that's it's finished making coffee, or the sound of metal cooling off. I had no idea what was pinging, but those three pings were my start. So I wrote "Ping. Ping. Ping." and then started describing what I see most mornings. In the story, I'm sitting at my kitchen counter working on my laptop while one cat snoozes and the other is rolling around and smiling (my hubby's cat does that a lot) when I hear the pings. I can't figure out where the sound's coming from. It's only three pings, so I go back to what I was doing. A while later, I hear the three pings again.
As I wrote, I kept describing what I was seeing, all very ordinary things. I mentioned in the story that I was working on my sales tax, a very dreary job. When "story me" found out what was making the pings, it was a life-changing event!
In 20 minutes in LONGHAND I wrote nearly 1000 words!! And it's an entertaining read (so far!) and was great fun to write! I transcribed it into the computer last night, cleaning up some messy phrases and changing a word here or there, but really, I didn't do much editing at all. I was amazed that it was so clearly written the first time through.
The lesson we were supposed to learn from this was that sometimes the freshest writing comes from changing the instruments you use to write. If you're writing longhand, you don't sit and edit yourself as much as you do if writing on a computer. Stopping to edit your work stops the forward motion of the story. The first draft should be written straight through, beginning to end, with no stops for corrections if you can manage it. I know this is true, but lately, I've been spending a lot of time "fixing" the first part of a novel I'm working on. I think it's going to be a good story, but it isn't just flying out of my fingers like others have. This one's more like (*gasp!*) work! Of course, I'm inventing a new world, which makes things more complicated, but I think it's a good read and writing it is interesting to me. My hand cramps if I write by hand very long, and my handwriting is terrible, but perhaps my story would move along faster if I tried handwriting the section I'm stuck on. I just may try it. I'll let you know how it works!
It can be very hard to come up with something to write about in a short time like that. Some in the group worked on articles or stories they were already working on while others made up either fiction or non-fiction.
I had no idea what to write, but as soon as he told us to start, three words popped into my head: Ping. Ping. Ping. It was a sound - like a fingernail tapping on glass or the beeping signal from a machine that's it's finished making coffee, or the sound of metal cooling off. I had no idea what was pinging, but those three pings were my start. So I wrote "Ping. Ping. Ping." and then started describing what I see most mornings. In the story, I'm sitting at my kitchen counter working on my laptop while one cat snoozes and the other is rolling around and smiling (my hubby's cat does that a lot) when I hear the pings. I can't figure out where the sound's coming from. It's only three pings, so I go back to what I was doing. A while later, I hear the three pings again.
As I wrote, I kept describing what I was seeing, all very ordinary things. I mentioned in the story that I was working on my sales tax, a very dreary job. When "story me" found out what was making the pings, it was a life-changing event!
In 20 minutes in LONGHAND I wrote nearly 1000 words!! And it's an entertaining read (so far!) and was great fun to write! I transcribed it into the computer last night, cleaning up some messy phrases and changing a word here or there, but really, I didn't do much editing at all. I was amazed that it was so clearly written the first time through.
The lesson we were supposed to learn from this was that sometimes the freshest writing comes from changing the instruments you use to write. If you're writing longhand, you don't sit and edit yourself as much as you do if writing on a computer. Stopping to edit your work stops the forward motion of the story. The first draft should be written straight through, beginning to end, with no stops for corrections if you can manage it. I know this is true, but lately, I've been spending a lot of time "fixing" the first part of a novel I'm working on. I think it's going to be a good story, but it isn't just flying out of my fingers like others have. This one's more like (*gasp!*) work! Of course, I'm inventing a new world, which makes things more complicated, but I think it's a good read and writing it is interesting to me. My hand cramps if I write by hand very long, and my handwriting is terrible, but perhaps my story would move along faster if I tried handwriting the section I'm stuck on. I just may try it. I'll let you know how it works!
Doing Research for Your Art
I love the forums at http://www.wetcanvas.com. Artists of all experience and skill levels hang out there and discuss media, techniques, critique each other's work, etc. in a friendly, supportive atmosphere. I highly recommend WetCanvas to artists of all levels, both amateur and professionals.
A few days ago, I was writing a second critique (at the artist's request) on a colored pencil piece and started getting philosophical about how you should look at horses (or whatever your subject is) in order to portray them in art. At one point, I said, "Sounds like I'm starting a blog post," so here I am, writing that blog post.
When you paint, draw or sculpt something that's alive and you want it to LOOK alive, you need to represent it as accurately as possible. I'm not saying all art has to be realistic, but if you do something that looks at least somewhat realistic, then the joints and muscles should be in the right placement and position for whatever movement is going on.
"Reflection" (cold-cast porcelain, shown above) certainly isn't built realistically. The structures in the head and neck are exaggerated or stretched to make the piece an impression of this horse. Those who know this horse (Reg. name, "Rusted Spruce," show name when my daughter had him, "Imagine A Legacy," barn name "Stretch") recognize him despite his being stylized. That was my goal, to do a recognizable portrait yet make it unique in its style. And yes, I realize there are errors in this piece, but it was also one of my earliest sculptures, so I was still learning my craft. Yet despite its flaws, it's a lovely piece, has won awards and sells well.
Too many artists depend only on pictures for reference. That's fine, but you also need to learn about the subject, whether it's a horse or a human or a cat or a raccoon - whatever it is, it has a particular way its eyes are set (for instance). Horses, being prey animals (dinner for other animals, in other words), have their eyes on the sides of their heads so they can see behind them as well as in front. When a horse is grazing, he can see 350 degrees around him. A predator has his eyes on the front of his face, like a human, a dog, cat, lion, raccoon. These are species who chase down other animals to be their dinner. Their range of vision is much smaller than a horse's - 150 degrees for dogs and cats, and a smaller range for humans since our eyes are set more to the front of our heads than they are on dogs and cats. (Ref: http://www.mini-horse.org/vision_range.html)
My husband was standing just a bit to the right of center (as he faced my horse Ricos) when he took this photo, which is why the right eye looks bigger than the left. You need to pay attention to these distinctions when using photos for reference.
Each species has a particular way of moving. Horses have four legs, but they don't move the same way cats, dogs or armadillos do. You need to understand the pattern of footfalls for each species you portray, and in the case of many animals like horses and dogs, you need to know how the breed you're portraying moves. A dressage horse moves much differently than a Paso Fino, for instance. A Chinese Crested moves much differently than a German Shepherd. If you don't have a clear understanding of such things, you may make a bronze or a painting that will last for years and years but is portraying an inaccurate movement, inaccurate tail carriage, the wrong shape and attitude of the animal's ears, etc. People who know that kind of animal will look at the artwork and shake their heads, wondering why you didn't do enough research to know how much weight that leg should bear at that point in the stride, why you have a Quarter Horse doing a pace instead of a trot, why your Chinese Crested isn't doing a prancing trot, why the German Shepherd isn't built with his haunches lower than his shoulders, etc.
One way to learn about the structure of animals is to go see them in person. It's even better if you can run your hands over the animal's legs or muscles with your eyes closed as well as with them open, so you can get a real understanding of their structure. What works for me, and what I recommended to the artist on WetCanvas today, is to find a horse (in this case) that has been bodyclipped (since they're in winter coats now) so the muscles, tendons and bones are as easy to see and feel as possible. If you can't find a bodyclipped horse, then one with smooth hair over their legs will do. A horse with feathered legs like "Masestoso" above, isn't what you want to look at for this exercise. Point of interest about horses with feathered legs: When examining a Friesian for one of my Friesian sculptures (an earlier piece than this one), I discovered the feathers start at the chestnut - halfway up the forearm, and just below the hock. I had no idea they started that high until I did my research on a live horse.
A few days ago, I was writing a second critique (at the artist's request) on a colored pencil piece and started getting philosophical about how you should look at horses (or whatever your subject is) in order to portray them in art. At one point, I said, "Sounds like I'm starting a blog post," so here I am, writing that blog post.
"Reflection" (cold-cast porcelain, shown above) certainly isn't built realistically. The structures in the head and neck are exaggerated or stretched to make the piece an impression of this horse. Those who know this horse (Reg. name, "Rusted Spruce," show name when my daughter had him, "Imagine A Legacy," barn name "Stretch") recognize him despite his being stylized. That was my goal, to do a recognizable portrait yet make it unique in its style. And yes, I realize there are errors in this piece, but it was also one of my earliest sculptures, so I was still learning my craft. Yet despite its flaws, it's a lovely piece, has won awards and sells well.
Too many artists depend only on pictures for reference. That's fine, but you also need to learn about the subject, whether it's a horse or a human or a cat or a raccoon - whatever it is, it has a particular way its eyes are set (for instance). Horses, being prey animals (dinner for other animals, in other words), have their eyes on the sides of their heads so they can see behind them as well as in front. When a horse is grazing, he can see 350 degrees around him. A predator has his eyes on the front of his face, like a human, a dog, cat, lion, raccoon. These are species who chase down other animals to be their dinner. Their range of vision is much smaller than a horse's - 150 degrees for dogs and cats, and a smaller range for humans since our eyes are set more to the front of our heads than they are on dogs and cats. (Ref: http://www.mini-horse.org/vision_range.html)
My husband was standing just a bit to the right of center (as he faced my horse Ricos) when he took this photo, which is why the right eye looks bigger than the left. You need to pay attention to these distinctions when using photos for reference.
You may not be able to see the chipmunk in this sculpture since the photo's small, but this cougar, a predator, has his eyes on the front of his head. The chipmunk, a prey animal, has them on the sides. (The chipmunk's on the rock near the bottom and just left of center in case you haven't found him yet.) This piece is "In the Wind" and is a bronze. All the art shown here is mine, BTW.
Each species has a particular way of moving. Horses have four legs, but they don't move the same way cats, dogs or armadillos do. You need to understand the pattern of footfalls for each species you portray, and in the case of many animals like horses and dogs, you need to know how the breed you're portraying moves. A dressage horse moves much differently than a Paso Fino, for instance. A Chinese Crested moves much differently than a German Shepherd. If you don't have a clear understanding of such things, you may make a bronze or a painting that will last for years and years but is portraying an inaccurate movement, inaccurate tail carriage, the wrong shape and attitude of the animal's ears, etc. People who know that kind of animal will look at the artwork and shake their heads, wondering why you didn't do enough research to know how much weight that leg should bear at that point in the stride, why you have a Quarter Horse doing a pace instead of a trot, why your Chinese Crested isn't doing a prancing trot, why the German Shepherd isn't built with his haunches lower than his shoulders, etc.
One way to learn about the structure of animals is to go see them in person. It's even better if you can run your hands over the animal's legs or muscles with your eyes closed as well as with them open, so you can get a real understanding of their structure. What works for me, and what I recommended to the artist on WetCanvas today, is to find a horse (in this case) that has been bodyclipped (since they're in winter coats now) so the muscles, tendons and bones are as easy to see and feel as possible. If you can't find a bodyclipped horse, then one with smooth hair over their legs will do. A horse with feathered legs like "Masestoso" above, isn't what you want to look at for this exercise. Point of interest about horses with feathered legs: When examining a Friesian for one of my Friesian sculptures (an earlier piece than this one), I discovered the feathers start at the chestnut - halfway up the forearm, and just below the hock. I had no idea they started that high until I did my research on a live horse.
"Presence" (Bronze, above) has lovely clean legs. It would be easy to run your hands over them to learn their structures. Before you start working around the back legs of a horse you aren't familiar with, ask the horse's handler to hold the horse's front leg up to keep the horse still and protect you from being kicked. Then gently run your hands down his legs, learning the feel of the muscles, tendons and bones and how they work together. Be sure to cup your palm over the hock bone itself - that point isn't sharp nor is it small. It's a big, wide bone that will fill your hand. Remember that when you're portraying it.
Once you've run your hands over his legs, if you're a 2-D artist, sit at eye-level to the horse's hocks, but far enough away that he can't kick you, and draw his leg, paying close attention to the joints, muscles and how everything's tied together. Have someone lift a back leg and run your hands over that hock joint and the pastern when they're bent, then sit down and draw them. Do the same for the front legs. If you're a sculptor, do a quick sketch in clay of the leg you're studying. You'll be amazed at how much this exercise improves how you portray legs.
Tuesday, December 29, 2009
Mounting "Just Tryin' to Help" and "Tolte" progress
"Just Tryin' to Help" is a bronze comprised of two related sculptures, a filly and a man. Both are 1/4 lifesized. The man is looking directly at the filly when they're arranged correctly, but after seeing how other folks move them around, I decided they needed to be on a base to relate to each other properly. So my basemaker, Diane Soper of Sistermaide Woodworking in Lewisburg OH, made beautiful bases for me (as usual!) and today we mounted the bronzes. It took a lot more doing than you might expect - I hold the horse upside down in my lap while she makes a template for the bottom of the bronze, marking where the drilled and tapped holes are inside the bronze's base. Then she marks the wood and drills the holes and we spend a lot of time trying to line up the hole in the bronze with the hole in the wood from the bottom of the wooden base. It's a lot more trouble than it sounds like, believe me! And because it's so much physical labor and hard on both of us, I think I may have the foundry (which is full of big, burly men!) put the base on "Tolte" since it will weigh between 60 and 80 lbs! Anyway, here are pictures of my beautiful Bitsy baby when she was a little one, and my hubby John, in a scene from real life here on our farm.
And now more progress on "Tolte." These pics show progress made as of 12/27/09.
The toothpicks sticking out of her are markers for joints (knee, hock, fetlock) and her eyes, to help me keep things measured correctly. The small lump of clay at the top of her right shoulder is a note to myself to build that shoulder up more, since her weight is on it (this after a visit from my daughter, Jennifer Truett of Dancing Horse Farm, Lebanon OH - she's a dressage trainer and FEI level rider with a great eye for conformation). I wasn't really at the point of building that shoulder up yet, but since Jennifer pointed it out, I put a bit of clay there to make sure I wouldn't forget to build it up. I try to get her to look at my sculptures at least before they go to the foundry so someone who knows what to look for can make sure I haven't missed anything!
Yesterday when I went out to the studio, suddenly that right foreleg (the one that's on the ground) looked too far back. I messed around with the muscle a bit to make sure my eye wasn't being fooled. It wasn't! So I had to rip that leg off - yes, that's what I said! I had to remove the clay that was over the wax, then soften the wax by warming it with a hair dryer. Once it was warm enough, I could remove the leg and the pad of wax that was holding it in. Here's the hole after I removed the leg.
I cleaned out the hole, cleaned off the armature wax I would need the next batch of wax to adhere to, and moved the hole in the shoulder forward so the leg would be about 1/4 inch farther forward than it was before. Here's the horse with her leg replaced.
And now more progress on "Tolte." These pics show progress made as of 12/27/09.
The toothpicks sticking out of her are markers for joints (knee, hock, fetlock) and her eyes, to help me keep things measured correctly. The small lump of clay at the top of her right shoulder is a note to myself to build that shoulder up more, since her weight is on it (this after a visit from my daughter, Jennifer Truett of Dancing Horse Farm, Lebanon OH - she's a dressage trainer and FEI level rider with a great eye for conformation). I wasn't really at the point of building that shoulder up yet, but since Jennifer pointed it out, I put a bit of clay there to make sure I wouldn't forget to build it up. I try to get her to look at my sculptures at least before they go to the foundry so someone who knows what to look for can make sure I haven't missed anything!
Yesterday when I went out to the studio, suddenly that right foreleg (the one that's on the ground) looked too far back. I messed around with the muscle a bit to make sure my eye wasn't being fooled. It wasn't! So I had to rip that leg off - yes, that's what I said! I had to remove the clay that was over the wax, then soften the wax by warming it with a hair dryer. Once it was warm enough, I could remove the leg and the pad of wax that was holding it in. Here's the hole after I removed the leg.
I cleaned out the hole, cleaned off the armature wax I would need the next batch of wax to adhere to, and moved the hole in the shoulder forward so the leg would be about 1/4 inch farther forward than it was before. Here's the horse with her leg replaced.
I still h ave a lot of repair work to do. I had to cover the shoulder with clay and build it up again (and add the height to it that indicates it's bearing weight, as my daughter pointed out) and repair the sculpting in the leg itself as well as making it stick to the board with some clay.
The problem with working with wax is that wax chips (bits that get broken off while working with it or while removing clay that's touched it) get into everything, so I spent quite a while picking chips of wax out of the clay. If I'd left them there, the bronze would have strange-looking bumps and flat spots here and there because of them, which wouldn't be good at all!
Here's the mare with her shoulder repaired and her leg in better shape.
I'm still not happy with her shoulder, but her foreleg is in a better position. I will double-check the position of her hind legs now that there's enough clay on them for me to have a better idea how all of her parts are going to relate to each other.
I don't know if I've shown you how I melt the wax. I use metal cake pans on electric griddles. I have to be careful to not get it too hot. The lump you see here is the wax I removed from her shoulder, which I used in her shoulder again once it had softened enough to work with.
And that's where I am now. Her barrel needs to be filled out a bit on the bottom so it's evenly round and I have to check those back legs, but overall, she's getting into decent shape. Before I get too detailed on her, I'll have to start her rider. That's another blog for another day . . .
Monday, December 07, 2009
"Tolte" work in progress
This is the piece I wrote about before, when I was showing how I was doing a different kind of armature than I normally do. She's a lot farther along now than these pictures show, but I haven't had time to take newer pics of her yet.
After working on her for a while, I realized that pushing on her to add clay was making her armature twist on its post. I should've glued the post into the floor flange as well as the plumbing T. Normally, wax should hold the T in place with no problem, but I'm pushing the piece pretty hard, so cold wax could crack and loosen. Super Glue to the rescue!
I cut her belly open (not such a huge job since she's still mostly a silhouette, not filled out much at all) to expose the bottom of the plumbing T and cleaned the wax off the metal at the bottom and up inside the T a bit so the glue would be attaching metal to metal, not metal to wax. It wouldn't be as strong a seal if the glue attached metal to wax. To get to the bottom of the T so I could put the glue inside the place where the T meets the pipe, I had to lay the horse over on her side.
After working on her for a while, I realized that pushing on her to add clay was making her armature twist on its post. I should've glued the post into the floor flange as well as the plumbing T. Normally, wax should hold the T in place with no problem, but I'm pushing the piece pretty hard, so cold wax could crack and loosen. Super Glue to the rescue!
I cut her belly open (not such a huge job since she's still mostly a silhouette, not filled out much at all) to expose the bottom of the plumbing T and cleaned the wax off the metal at the bottom and up inside the T a bit so the glue would be attaching metal to metal, not metal to wax. It wouldn't be as strong a seal if the glue attached metal to wax. To get to the bottom of the T so I could put the glue inside the place where the T meets the pipe, I had to lay the horse over on her side.
Once I got the glue in place, using a toothpick to apply it, the piece could be set upright again and I could go back to work. I think you'll see in the following pictures that I added clay to the wax around the bottom of the leg wires to help anchor them to the table. There will be a whole patch of ground under the horse, so once I have that in place, the feet will be secure. With my normal aluminum wire armature, I just staple the wires in place to be secure, but with this heavy copper wire, that's not possible.
I scraped back the clay at the shoulders and hips until I reached the wax so the wax I'm using to hold the leg wires in place will stay put. Wax makes a strong bond to other wax, but its bond to clay is not as strong. The legs are firmly in place now.
The horse is still much thinner than she will be when she's finished, but I made sure I built the wax and clay up so her legs are coming out at the right part of her body. They aren't set too far inside nor too close to the surface. More clay will be added over the wax. Here's how it looks:
I know it looks like the leg bones are too far back in the front leg that's on the ground and too far forward in both back legs, but I promise you, once the muscle's on it, they will prove to be in the right place! And if they aren't, I'll move them until they are!
Here she is after I covered the wax with clay:
She's still skinny, but we're making progress! Here's how she looked a day later:
I've laid on enough clay to thicken her body quite a bit. I know there are some proportions that are wrong for now, and the line of her back/loin/croup isn't the best, but I'm getting there!
I have clay down the length of some of her legs now. I'll take more pictures and show you her progress again soon.
Subscribe to:
Posts (Atom)