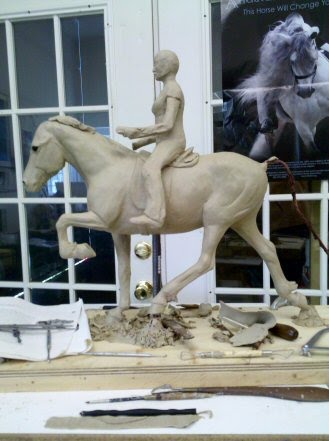
It finally looks like I'm getting somewhere on this piece! A lot of the previous work has been painstaking and tedious, trying to get the horse built properly, making sure there are no dips or bumps where there shouldn't be, and making the horse a functional being with all the joints in the proper places, etc. Now I've added a saddle and the rider. The rider will be removed for shipping - she's only attached by a couple of wires sticking out below her seat bones into the horse. She'll be welded or soldered in place by the foundry when this piece is cast in bronze.
The saddle is supposed to be an Icelandic saddle. In addition to looking at the photos I took of my client's two saddles, I researched them online and found quite a wide variation in how they look. I'm going with the English show saddle look rather than the quilted seat I found on several Icelandic saddles simply because it's less distracting visually to have a smooth seat rather than a quilted one. I will probably cut the flaps a little shorter - they look too long in comparison with the rider's leg.
I've had to redo the cantle of the saddle about five times now, trying to get it placed right and to make it fit the horse and rider both as well as possible. I think I'm about there with the cantle. Now I'm working on the length of the rider's legs and the shape of her boots. I realized I had cut the wire too short on one leg and had to add some wire to have a good support for her foot. That's why I'm posting these pics today, to show you how I did that repair.

I've cut off the clay at the bottom of her leg, exposing the wire. I then attached a lighter wire, wrapping it securely around the existing wire of the leg, using pliers to help me get it as tight as possible. After wrapping it several times around the larger wire to make it as secure as possible, I started twisting the wire to both strengthen the wire and to give the clay something to bite into so it won't slide around. (Aluminum wire is slippery to clay if it isn't either twisted itself or isn't wrapped around another wire.) I doubled the twisted wire (shown above) back on itself and twisted it some more to make it stronger (not shown), then added clay over that to make the new foot.
Here's a closeup of the wire before I folded it back on itself and twisted it again.
Here's the other side of the piece. This leg is actually a bit too short too, but there's plenty of wire there. I'll pull the clay off the foot, straighten the wire for a short distance to lengthen the leg, then bend the end up to support the foot and add clay to make the boot again.
I'm having to fight my dressage training in positioning the rider. She doesn't ride dressage nor do other Icelandic riders (with a few exceptions I know of), so putting her in a dressage position would be wrong. I haven't had this much trouble positioning a rider in a long time - I guess that shows my dressage training is becoming ingrained! But I need to be careful about that with my art. Not all riders ride dressage.
That gorgeous picture behind the sculpture is the International Andalusian & Luisitano Horse Association (IALHA) poster from a couple of years ago featuring the gorgeous stallion, Santiago. His mane really does reach down past his knees and he seems to have a lovely disposition. I was fortunate enough to see him at the Midwest Fiesta in 2008 and was given one of these posters then (I had my art booth there marketing my art while I was working on the original of "Feather," which is an Andy stallion now available in bronze). I had no idea at the time that within a few months of that show, I'd have my very own half-Andalusian (El Paso Aricos, my dressage horse). Surprise surprise!
This is a picture of my handsome Ricos with my daughter, trainer Jennifer Truett of Dancing Horse Farm, Lebanon OH (www.dhf-oh.com) riding him. Since I mentioned him in reference to that IALHA poster, I thought I'd include his picture here. I like this picture so much, I use it as my desktop.
Back to the sculpture: Don't worry about the rider's face - right now her facial features are more "markers" than anything else. She doesn't look like herself at all yet! Her face is even a bit mashed because I grabbed her head and changed the angle of her neck and head from the side (they were too far back). Her arms and hands haven't been worked on at all yet. I'll get to them, don't worry!
A lot of sculpting (the way I do it, anyway!) seems to be "take two steps forward, three steps back" at times. As I work around the piece, I may find that something that looked and measured right before is now too long or too short in relation to some other part and the reference material. Just by bending one leg of the rider down so it laid properly along the horse's side changed the way it looked lengthwise, so I had to make some adjustments. That kind of thing happens frequently. Just one of the many challenges of 3-D work!
The little lump of clay on the horse's neck is a sign of my eagerness to get to the mane and tail. They're some of the last things I do on a sculpture, but they're also FUN so I'm eager to get to them. But it's too soon, so I was just messing around and left it there.
I'm pleased with the progress so far. Yay!