Showing posts with label Icelandic. Show all posts

Monday, May 02, 2011

Updates on "Tolt" and "Nanning"

"Tolt" is in metal!  I got some "approval pics" from the foundry last week.  There are a couple of things I want them to fix (the reins should not be looped up above the rider's hands, and the stirrups are too far back on the feet), but overall, it's beautiful!! 


The maquette of Nanning is coming along well.  I've added hair to the tail and have started putting clay on for the mane, but the clay for the mane isn't "installed" yet.  It's just lying there on the surface in strands much too thick for the finished version because right now, I'm just working out the movement of the mane.  Once I've figured out how I want it to be, I'll thin those strands and make sure they're well-attached to the sculpture, as well as having mane on both sides of the neck..


I enjoy working on the "hairy" parts of horse sculptures.  That's where I can get more creative with it.  I think he's going to be gorgeous!!

Monday, August 30, 2010

All but the Signature . . . I hope!

I think "Tolt" is nearly finished.  I just have to clean up the clay, make the pads under the horse's feet more uniform in shape and sign the title, my name and copyright along the sides of those pads.  Then I have to clean all that up too.  (Signing sculptures is a pain - nowhere near as easy to do as signing a painting!) 

I've spent literally two to three weeks pondering and picking at and trying to sculpt the rider's hands until today when I finally got everything to work the way I wanted.  It's very hard to sculpt the part of the fingers and palm that are near the horse, so I finally turned the forearms and hands out away from the horse so I could see the inside shapes better.  There are suggestions of fingernails there and even my customer's gorgeous sapphire ring is shown as a general shape on her left hand.  Her arms and hands were hard for me to do - getting the muscling and the shapes of the parts right is quite a challenge, but I think everything's good now.

I like the way the wrinkles turned out in her shirt and breeches.  I textured her clothing to make it look different from her skin when it's bronze.  I think it will be a nice look to have that slight texture on the cloth.

The clay stirrups you see on the working surface won't be the ones used.  I made Super Sculpey ones so they'll be sturdier to ship (Super Sculpey is a polymer clay you can bake in the oven so it's hard, unlike plastilene which is always soft.)  The stirrups, stirrup leathers and reins will all be hand-made at the foundry for each piece, although they MAY be able to cast the stirrups.  I'm not sure if they're thick enough to cast well unless they use jewelry-type casting (centrifugal casting). 

Without further ado, here are the pictures!

The shape behind the hoof is supposed to be a splash of dirt.  I may change it a bit before declaring a victory on this piece.
When I saw this pic, I realized I need to add a browband.  I'll do that tomorrow.

  I'll be glad to get this one finished!  I've been working on it a long time, but I'm happy with how it's turned out.

Tuesday, July 27, 2010

Beginning of the end - I hope!

I'm getting close to finishing this piece, HUZZAH!  I just need to add a bridle on the horse and do the wrists and hands of the rider, thicken the tail a bit and make the rider's eyes match better - they're a tiny bit off.  Then I have to sign it and I'm finished!!
The horse's tail is nice and thick-looking from the back, but from the side, it isn't quite bushy enough.  Like most Icelandics, this mare has a really thick mane and tail.  I think the mane looks pretty good, but the tail needs to be thicker and needs more movement as seen from each side.  I'll work on that today.

The "splash" you see behind that right hind foot is necessary for support and strength for the piece.  In real life, that foot would be flying through the air like both left feet, but the horse needs more than one point of contact with the base in order to be strong enough to stand without bending the supporting leg.  The "splash" of dirt may be modified a bit, I don't know yet.  It's easy to sculpt them in relief, but doing them 3-D, it's a lot harder to get the look I want.

The stirrups are on the working surface (the board) in front of the piece in the photo above.  They won't be attached until the piece is in bronze because they are too delicate to cast properly.  They will be hand made for each sculpture, just as the bit rings, stirrup leathers and reins will be.  I think I'm going to remake the stirrups out of Super Sculpey so they'll ship more safely.

See how nice and thick her tail looks from behind?  I need to get that feeling from each side too.  Her ears barely show from all the flying forelock in real life.  I'm still trying to decide if I want to put more forelock on her to hide more of her ears or not.  What do you think?  I'm open to suggestions!

The rider's neck looks a bit rough because I haven't cleaned this sculpture up with chemicals yet.  When I finish, I'll use a small filbert paint brush and some orange cleaning liquid straight from the bottle (I'll squirt it into a small bowl I can dip the brush in) and paint the whole thing with the cleaning liquid.  That chemical will melt the surface of the clay just a tiny bit, smoothing out some places and getting rid of the crumbs as well.  I may still need to do some clean-up with tools after I use the chemical, but the chemical will show me where I need to do that.

She looks like my customer, which pleases me a lot since I haven't done a sculpture of someone with an open smile before.  Every picture I have of her, she's got a happy smile on her face, so that's what I used.

I have stirrup leathers on the inside of the rider's legs, cut off at the point where they would not be against hte leg in real life as they stretch to support the stirrups.  The foundry will add flattened copper wire the width of the leathers I've started when they put the stirrups on.

If you have questions or comments, feel free to write me!  Thanks for your interest.

Tuesday, July 06, 2010

Ahhh, that's better . . . "Tolt" and "Star Sons 2" news!!

I finally saw what was bothering me about the rider's face.  I knew something was a bit off, but I couldn't quite figure out how to fix it.  Then I saw it.  The eyes were set too high (by about 1/16th of an inch), and the place where the nose dips in toward the eyes was set in the wrong place (by an even smaller margin).  So today I put dabs of clay in the places where the eyes were, smoothed that out and started over - not my favorite thing to do, especially on something as delicate and difficult to create as the eyes on this rider.  But I did it, and revised the shape of her cheekbones somewhat, her temples and browbone, the nose, and even brought the brim of the helmet lower and trimmed some off the top of the helmet.  I like it a lot better now.  I think I need to broaden the lower cheeks and jaw just a tiny bit on each side, and then it just might look like my customer!  YAY!  Here are some pictures to show what I accomplished today.

I know her helmet still needs straps, but I'm not going to add them until I'm satisfied with her face.

As you may be able to see from the pictures above, and will certainly see in the picture below, I also started working on the mane, getting the masses of the flying mane and forelock somewhat defined on one side, as well as filling in holes and undercuts so it will cast well.

I think this will be a beautiful piece!  I'm excited to see it coming together so well!

In other news, I've finished the revisions on my second "Star Sons" novel (titled "The Gathering Alliance") and am printing it out right now for a final read-through to make sure I haven't missed anything in proofreading.  The cover art is finished and there are only a few details to complete before it will be ready for publication.  HUZZAH!!!  I'll post ordering info here and on Facebook and my Yahoo groups when it's ready to go.  It will be available from me as well as from Amazon.com, BN.com and various other outlets. You will also be able to order it in your local bookstore with its ISBN number.  I'm excited to have this finished!  YAAAY!!

Wednesday, June 09, 2010

Boots, breeches and stirrups

Today I made stirrups for my rider.  That's a lot  harder than you'd think.  It took me a while to find the right size wire to be the top of the stirrup (to look the right size while covered with clay) and to make the tread of the stirrup strong and straight.  I used scraps from the perforated aluminum sheet I'm using as the armature for Feather's wings to make the tread strong and straight and aluminum armature wire for the top.  The bottom loop where the stirrup leather goes through was added by just putting a roll of clay there and carving it down.  You may be able to see that on the pic of the rider with the stirrup in place.

That pic is a bit crooked, sorry.  The leather goes up inside the rider's leg and is adhered to her leg and the horse, in the appropriate places.  I'll cut the stirrup off the piece just above where the leather goes through the stirrup when I get ready to send it to the foundry.  It would just drop off if the piece was dropped or shaken as it will be in shipping.  They can weld it in place in bronze.

The boots and breeches are done, and I think you can see the bottom of her shirt.  She was wearing a blouse that wasn't tucked in, and for now, I'm sculpting what she was wearing.  I'm going to send her pics soon so she can decide if she wants her shirt tucked in, sleeves on the shirt (her shirt was sleeveless), etc.

This shot's a bit closer, but also crooked - hard to get great shots with a phone.  I'll straighten these pics and re-upload them when I have more time.  I'm kinda rushing to get this online right now. 

BTW, this hind foot will soon be cut free of the wire holding it to the ground.  This foot in reality wouldn't have any dirt splashing up to support it, so I have to make it free.  I talked to my foundry about it to make sure having only two legs on one side would be strong enough to support a piece this big without it bending.  Bronze is soft, after all - it's mostly made out of copper.  Anyway, they said it should be fine, and they'll put bronze rods inside the legs touching the ground to strengthen them if they think that support will be needed.

When I cut this foot free, I will cut the wire up inside the hoof (thus ruining that nice hoof, so I'll have to sculpt it again) and then I'll put a wall, sole and frog in the bottom of the foot.

This is how the whole piece looks right now.  I haven't done any work above the waist - it's all just "placeholders" for now, measured pretty well, but not sculpted anywhere near what those parts will be like when it's finished.  I need to raise the shoulders a bit - they're too low.

Anyway, that's progress to date!  Comments and questions are welcome.

Thursday, June 03, 2010

Progress!

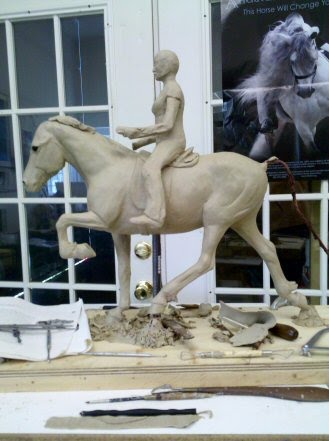
It finally looks like I'm getting somewhere on this piece!  A lot of the previous work has been painstaking and tedious, trying to get the horse built properly, making sure there are no dips or bumps where there shouldn't be, and making the horse a functional being with all the joints in the proper places, etc.  Now I've added a saddle and the rider.  The rider will be removed for shipping - she's only attached by a couple of wires sticking out below her seat bones into the horse.  She'll be welded or soldered in place by the foundry when this piece is cast in bronze.

The saddle is supposed to be an Icelandic saddle.  In addition to looking at the photos I took of my client's two saddles, I researched them online and found quite a wide variation in how they look.  I'm going with the English show saddle look rather than the quilted seat I found on several Icelandic saddles simply because it's less distracting visually to have a smooth seat rather than a quilted one.  I will probably cut the flaps a little shorter - they look too long in comparison with the rider's leg.

I've had to redo the cantle of the saddle about five times now, trying to get it placed right and to make it fit the horse and rider both as well as possible.  I think I'm about there with the cantle.  Now I'm working on the length of the rider's legs and the shape of her boots.  I realized I had cut the wire too short on one leg and had to add some wire to have a good support for her foot.  That's why I'm posting these pics today, to show you how I did that repair.

I've cut off the clay at the bottom of her leg, exposing the wire.  I then attached a lighter wire, wrapping it securely around the existing wire of the leg, using pliers to help me get it as tight as possible.  After wrapping it several times around the larger wire to make it as secure as possible, I started twisting the wire to both strengthen the wire and to give the clay something to bite into so it won't slide around.  (Aluminum wire is slippery to clay if it isn't either twisted itself or isn't wrapped around another wire.)  I doubled the twisted wire (shown above) back on itself and twisted it some more to make it stronger (not shown), then added clay over that to make the new foot.

Here's a closeup of the wire before I folded it back on itself and twisted it again.

Here's the other side of the piece.  This leg is actually a bit too short too, but there's plenty of wire there.  I'll pull the clay off the foot, straighten the wire for a short distance to lengthen the leg, then bend the end up to support the foot and add clay to make the boot again.

I'm having to fight my dressage training in positioning the rider.  She doesn't ride dressage nor do other Icelandic riders (with a few exceptions I know of), so putting her in a dressage position would be wrong.  I haven't had this much trouble positioning a rider in a long time - I guess that shows my dressage training is becoming ingrained!  But I need to be careful about that with my art.  Not all riders ride dressage.

That gorgeous picture behind the sculpture is the International Andalusian & Luisitano Horse Association (IALHA) poster from a couple of years ago featuring the gorgeous stallion, Santiago.  His mane really does reach down past his knees and he seems to have a lovely disposition.  I was fortunate enough to see him at the Midwest Fiesta in 2008 and was given one of these posters then (I had my art booth there marketing my art while I was working on the original of "Feather," which is an Andy stallion now available in bronze).  I had no idea at the time that within a few months of that show, I'd have my very own half-Andalusian (El Paso Aricos, my dressage horse).  Surprise surprise!
This is a picture of my handsome Ricos with my daughter, trainer Jennifer Truett of Dancing Horse Farm, Lebanon OH (www.dhf-oh.com) riding him.  Since I mentioned him in reference to that IALHA poster, I thought I'd include his picture here.  I like this picture so much, I use it as my desktop.

Back to the sculpture:  Don't worry about the rider's face - right now her facial features are more "markers" than anything else.  She doesn't look like herself at all yet!  Her face is even a bit mashed because I grabbed her head and changed the angle of her neck and head from the side (they were too far back).  Her arms and hands haven't been worked on at all yet.  I'll get to them, don't worry!

A lot of sculpting (the way I do it, anyway!) seems to be "take two steps forward, three steps back" at times.  As I work around the piece, I may find that something that looked and measured right before is now too long or too short in relation to some other part and the reference material.  Just  by bending one leg of the rider down so it laid properly along the horse's side changed the way it looked lengthwise, so I had to make some adjustments.  That kind of thing happens frequently.  Just one of the many challenges of 3-D work!

The little lump of clay on the horse's neck is a sign of my eagerness to get to the mane and tail.  They're some of the last things I do on a sculpture, but they're also FUN so I'm eager to get to them.  But it's too soon, so I was just messing around and left it there.

I'm pleased with the progress so far.  Yay!

Saturday, May 22, 2010

Details, details, details . . .

Now I'm at the point of building the saddle on the horse and making sure it fits the rider.  The rider is nowhere near perfect yet, but she's about as thick as she's going to be front to back (this is a petite middle-aged rider).  I  may need to adjust the length of her legs once I get back to work on her, but for now, I'm just getting the saddle assembled and placed where it should be.  I know I need to get her body more proportionate and to get her sitting on her seat bones.  I'll get there eventually.

At first, I had the saddle a bit long for this rider - If you look carefully, you should be able to see I've just cut the clay at the back of the cantle so it fits the rider better.  I've just turned a bit of clay over to fill in some of the seat behind her, actually, and then put a cut behind the cantle as a marker for when I get back to work on it.

You can also see I've put feathers on three of the legs now, and those legs have also developed muscles, bones and tendons.  I've put a bit of clay on the neck as well, starting to plan out the movement of the mane.  The strips of clay ahead of where the saddle's knee rolls should be in the picture below are just extra pieces I haven't trimmed off yet.  I've only developed the saddle on the left side and a bit on top.  The right side will be done tomorrow.


Here are some detail shots of the horse and rider. 

Don't worry, her ankles and feet will be straight with no wire sticking out of them when I get finished.  For now, this is very much a work in progress.  The knee rolls are just being developed and will be shaped better before I declare a victory over them.

I'm pretty pleased with how it's coming along.  Hope you enjoy seeing its progress!

Monday, December 07, 2009

"Tolte" work in progress

This is the piece I wrote about before, when I was showing how I was doing a different kind of armature than I normally do.  She's a lot farther along now than these pictures show, but I haven't had time to take newer pics of her yet.

After working on her for a while, I realized that pushing on her to add clay was making her armature twist on its post.  I should've glued the post into the floor flange as well as the plumbing T.  Normally, wax should hold the T in place with no problem, but I'm pushing the piece pretty hard, so cold wax could crack and loosen.  Super Glue to the rescue!

I cut her belly open (not such a huge job since she's still mostly a silhouette,  not filled out much at all) to expose the bottom of the plumbing T and cleaned the wax off the metal at the bottom and up inside the T a bit so the glue would be attaching metal to metal, not metal to wax.  It wouldn't be as strong a seal if the glue attached metal to wax.  To get to the bottom of the T so I could put the glue inside the place where the T meets the pipe, I had to lay the horse over on her side.
 

Once I got the glue in place, using a toothpick to apply it, the piece could be set upright again and I could go back to work.  I think you'll see in the following pictures that I added clay to the wax around the bottom of the leg wires to help anchor them to the table.  There will be a whole patch of ground under the horse, so once I have that in place, the feet will be secure.  With my normal aluminum wire armature, I just staple the wires in place to be secure, but with this heavy copper wire, that's not possible.

I scraped back the clay at the shoulders and hips until I reached the wax so the wax I'm using to hold the leg wires in place will stay put.  Wax makes a strong bond to other wax, but its bond to clay is not as strong.  The legs are firmly in place now. 

The horse is still much thinner than she will be when she's finished, but I made sure I built the wax and clay up so her legs are coming out at the right part of her body.  They aren't set too far inside nor too close to the surface.  More clay will be added over the wax.  Here's how it looks:


I know it looks like the leg bones are too far back in the front leg that's on the ground and too far forward in both back legs, but I promise  you, once the muscle's on it, they will prove to be in the right place!  And if they aren't, I'll move them until they are!

Here she is after I covered the wax with clay:


She's still skinny, but we're making progress!  Here's how she looked a day later:


I've laid on enough clay to thicken her body quite a bit.  I know there are some proportions that are wrong for now, and the line of her back/loin/croup isn't the best, but I'm getting there!

I have clay down the length of some of her legs now.  I'll take more pictures and show you her progress again soon.