Date Change: Real life has gotten in the way and messed up my schedule, so my sculpting workshop is going to be in late April 2013, still at Dancing Horse Farm, Lebanon OH. I'll post the exact dates soon, but it will be the 3rd or 4th week in April.
Now the rant! Someone posted in the Sculpture forum on Wetcanvas that when he bought some Super Sculpey in a local art supply store so he could start learning to sculpt, the clerks there told him he was going about learning sculpting the wrong way - that he had to learn to draw and he needed to learn anatomy first. Here's my reply:
Sculpting does not require drawing skills - I'm a prime example of that. For those of us whose minds work in the 3-D realm, sculpting is far easier than 2-D work. People who don't think 3-D (which is the majority of artists) don't understand the way 3-D thinkers think, the way we see things, the way we relate to things - seriously. And they believe you have to draw before you can do anything else in art. They'll point to famous artists who were/are both painters and sculptors (Michelangelo, for instance). Michelangelo considered himself a sculptor and claimed he couldn't paint (despite the evidence of the Sistine Chapel ceiling). I'm the same way - I learned to draw *after* becoming a proficient sculptor and it is HARD HARD HARD for me to do 2-D work, but I can if I have to. Don't let a 2-D artist's lack of understanding make you the least bit hesitant about sculpting. Sculpting is in your hands and your heart and your mind and you'll be amazed at what you can create once you understand the materials you're working with.
Now that I'm done ranting (for now, LOL!), I will say it's always good to learn anatomy any way you can. However, learning it by DRAWING isn't necessarily going to help you with learning how to sculpt it. You'll need to run your hand over the muscles of a horse or a smooth-coated dog (you don't want the muscles hidden by fur as they would be in a cat or long-haired dog) while its leg is being held in a flexed position, then study photographs done in excellent light of a leg in a similar position to see how muscles move under skin (for instance). Studying anatomical drawings and even copying them if you can draw decently can be quite useful. I use anatomy books with drawings all the time, but I mostly study anatomy in real life to do my art.
You need to pay attention to how the body moves - for instance, have you noticed that when someone is walking, the leg bearing weight makes that hip actually higher than the other one? (That's what makes women's rumps sashay prettily.) If a group of muscles bulge, the same ones on the other side will be shaped differently. I'm a horse artist, so I'll use horses as an illustration. Muscles bulge the most when they're contracted, so when a horse is LIFTING (not standing on) his left hind leg, for instance, his rump muscles (and abdominals, etc.) will be bulging while the muscles on his right hind leg, the one he's standing on, will look flatter because they're engaged in supporting the body, not contracting to shorten or move that leg. The more effort being expended, the more bulge you'll see in the muscles. Muscles at rest are flatter and more relaxed looking than those being used to lift a limb. If you haven't studied anatomy, you may not have consciously noticed such things, but they're also true in humans. Most people don't have the muscular development or else they have too much body fat for the muscles to be defined the way I'm used to seeing them in horses, so I use upper level dressage riders (who are strong athletes and always have highly developed thigh muscles and lightly developed calves - which is a sign they're dressage riders rather than jumper riders or western riders - just a detail to be observed if you want to portray the sport properly) or dancers as reference, with the occasional body-builder thrown in for fun at times. :)
There are 3-D anatomical models you can touch, move, light different ways to help you see anatomy. I'm not talking about those wooden doll things you can pose to get proportions. You can buy resin castings that are copies of Michelangelo's "David'"s ear, eye, nose, mouth, etc. There are full-body anatomical models in resin. There are some models that have half the man's body with skin over his muscles, and half showing the muscles with no skin. You can get horse models like that too. That's the way a 3-D mind learns anatomy, that and studying the real subject you're going to sculpt, whether people, horses, wildlife, etc. (Suggestion - if you're going to sculpt wildlife, run your hands over taxidermied animals - good ones - rather than getting THAT friendly with a real cougar or whatever! That's what I did to sculpt a cougar - it worked just fine.)
I "see" with my hands a lot. When I did my first portrait of a horse (rather than doing "imaginary" ones or ones based on reference photos), I asked the horse's owner to allow me to sculpt him from life once I had the piece fairly well along (I wanted to be sure I had the details and proportions right). The horse was tied up and I put the 3/4 finished bust on a tall tack box near him. I closed my eyes and ran my hands over that lovely stallion's head, then did the same to the 1/4 life-sized bust of him I was working on. The resulting bust is easily recognizable as him by those who know him even without his huge blaze (a white marking on his face) that covers most of his face. For people to recognize his bust that way rather than just thinking it's "just" a Quarter Horse is amazing to me since it was only my second attempt at a realistic horse and my first real portrait. (Copies of that piece are still for sale on my website: Fascination)
Don't let shop assistants deter you from sculpting. Get your hands in the clay (when using Super Sculpey, condition it first or your hands will get sore - it needs to be run through a pasta machine - rollers only, not cutters - several times to mix the oils in and soften the clay before you try to use it. Pasta machines are about $25 and available at Hobby Lobby, Michael's, Dick Blick's, etc.). Once you start working with the clay, your hands and innate knowledge will get you started on your first pieces. Then you'll see where you need to improve your knowledge and skill and the rest of it will be a joyful path of discovery. Let the 2-D people have fun with their paints. We're creating art you can touch, feel and appreciate from all sides. Good luck with it!
Showing posts with label sculpture workshop. Show all posts
Showing posts with label sculpture workshop. Show all posts
Thursday, September 27, 2012
Thursday, August 25, 2011
Digitally Enlarging the Maquette to Life-Size
Yes, I published this post in August. I was going to send it to a friend and discovered the formatting had gone all wonky! So I'm fixing it and re-publishing it. The bronze is finished now and will be installed in April! YAY!
* * * *
My life-size piece is being cast in bronze now. I can't wait to see it!! My husband and I went to Oregon for 9 days for me to work on the enlargement to make sure it was exactly the way I wanted it. My customer came out in the middle of the week to see it and make sure it was how he wanted it too. It passed both of our inspections by the end of the week!
The digital enlarging method ROCKS! First, the piece is scanned by a computer, then it's cut out by a 12' long 7-axis robotic arm (like the kind used in the auto industry), then clay is applied and ART happens! The scanner doesn't get into tight spots, so there was a curve that attached the testicles to the gaskins, instead of the line of separation that should've been there, but it was EASY to carve out the Styrofoam and touch up the area with additional clay. The horse's buttocks and tail created such a shadow, the scanner missed scanning the rectum completely, so I had to add that to the life-size, which again was no big deal. The enlarging place has a whole staff of people with degrees with sculpting working on the piece along with me, my husband and even my customer (who said I was like Tom Sawyer, getting everyone to work on it, LOL!)
When you go from maquette to life-size, any tiny errors in the maquette will show up as large errors (the life-size in this case is 700 times bigger than the maquette). Thankfully, no errors showed up once it was enlarged except for one ear not being set quite as straight as I wanted it to be (on the maquette, it looked fine, so it really was a small error). With help from the crew (since I didn't know how to do it), I cut the Styrofoam ear off, put it at the angle I wanted, secured it with a pointed dowel rod, then squirted glue under the gap. It's a foaming kind of glue from a caulking gun, so it expands and fills gaps. It's also easy to carve or rasp off if it's in the way. The dowel was hammered farther into the foam so it would be easy to pull out, then removed. Voila! Perfect ears!! The scanner made the edges of the ears and nostrils too thick because of its inability to "see" sharp edges like that. No biggie. I carved them off with a bread knife, then built up the clay to what I wanted.
Once the piece was fully assembled and all the finishing work done, it was cut into pieces to be sent to the foundry for casting. I worked from 8-5 for a week (and my shoulder didn't hurt much at all thanks to a cortisone shot the previous week!) It was hard work but I learned SO much!!!! And the piece is GORGEOUS! (Not just my humble opinion, either! LOL) The 12' long 7-axis robotic arm that's shown in the pictures can do a two day job in two hours! That's pretty darned amazing! You might notice in the following pictures that the edges of the hooves weren't as "crisp" as the edges of real hooves are. That was due to the way the machine cut them out. My customer fixed the hoof edges for me - I asked him to add that clay and he got it in really good shape himself before I came along and did the fine tuning. He sure enjoyed himself, and he'll be able to point to certain parts on the bronze and be able to tell his friends that he did that! I think that's great! :)
This was a FABULOUS experience for me! I hope I get more life-size commissions so I can go through this process again!
Below you can see the robotic arm cutting out the head and neck - the horse's face is to the left and the back edge of his neck to the right. This is the same kind of Styrofoam used to insulate office buildings. It comes in 8" thick blocks.


The computer split the scan of the legs and tail in half lengthwise. These parts are being cut out on this router table and will be glued together later.

Below is one of the master sculptors who works at the enlarging shop, working on the detailing of the mane. In the life-size, the details I put in the maquette's mane and tail weren't dynamic enough, so clay was added to make them a better size for the life-size. The sculptors there can do all the work for the original sculptor, either at their direction or without them even being there. Apparently I was unusual because I jumped right in and worked alongside them, which made sense to me - it's MY piece! My hands needed to be in every aspect of creating it!

Yeah, I'm happy with it! Awed by it, actually. It's amazing - and HUGE! Eight feet tall by 9 feet long without the cart it's mounted on at the moment.

I wish my parents were alive. It would be such a kick to be able to send this photo to them and say, "Look what I did!" :) I know they'd hang the picture on their fridge.

Thursday, June 03, 2010
Progress!
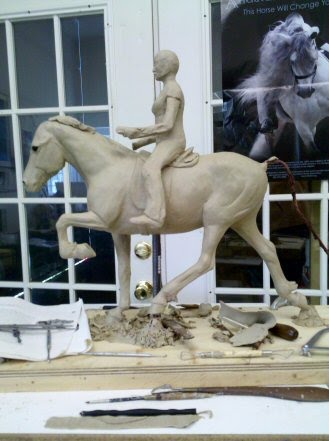
It finally looks like I'm getting somewhere on this piece! A lot of the previous work has been painstaking and tedious, trying to get the horse built properly, making sure there are no dips or bumps where there shouldn't be, and making the horse a functional being with all the joints in the proper places, etc. Now I've added a saddle and the rider. The rider will be removed for shipping - she's only attached by a couple of wires sticking out below her seat bones into the horse. She'll be welded or soldered in place by the foundry when this piece is cast in bronze.
The saddle is supposed to be an Icelandic saddle. In addition to looking at the photos I took of my client's two saddles, I researched them online and found quite a wide variation in how they look. I'm going with the English show saddle look rather than the quilted seat I found on several Icelandic saddles simply because it's less distracting visually to have a smooth seat rather than a quilted one. I will probably cut the flaps a little shorter - they look too long in comparison with the rider's leg.
I've had to redo the cantle of the saddle about five times now, trying to get it placed right and to make it fit the horse and rider both as well as possible. I think I'm about there with the cantle. Now I'm working on the length of the rider's legs and the shape of her boots. I realized I had cut the wire too short on one leg and had to add some wire to have a good support for her foot. That's why I'm posting these pics today, to show you how I did that repair.
 I've cut off the clay at the bottom of her leg, exposing the wire. I then attached a lighter wire, wrapping it securely around the existing wire of the leg, using pliers to help me get it as tight as possible. After wrapping it several times around the larger wire to make it as secure as possible, I started twisting the wire to both strengthen the wire and to give the clay something to bite into so it won't slide around. (Aluminum wire is slippery to clay if it isn't either twisted itself or isn't wrapped around another wire.) I doubled the twisted wire (shown above) back on itself and twisted it some more to make it stronger (not shown), then added clay over that to make the new foot.
 Here's a closeup of the wire before I folded it back on itself and twisted it again.
 Here's the other side of the piece. This leg is actually a bit too short too, but there's plenty of wire there. I'll pull the clay off the foot, straighten the wire for a short distance to lengthen the leg, then bend the end up to support the foot and add clay to make the boot again.
I'm having to fight my dressage training in positioning the rider. She doesn't ride dressage nor do other Icelandic riders (with a few exceptions I know of), so putting her in a dressage position would be wrong. I haven't had this much trouble positioning a rider in a long time - I guess that shows my dressage training is becoming ingrained! But I need to be careful about that with my art. Not all riders ride dressage.
That gorgeous picture behind the sculpture is the International Andalusian & Luisitano Horse Association (IALHA) poster from a couple of years ago featuring the gorgeous stallion, Santiago. His mane really does reach down past his knees and he seems to have a lovely disposition. I was fortunate enough to see him at the Midwest Fiesta in 2008 and was given one of these posters then (I had my art booth there marketing my art while I was working on the original of "Feather," which is an Andy stallion now available in bronze). I had no idea at the time that within a few months of that show, I'd have my very own half-Andalusian (El Paso Aricos, my dressage horse). Surprise surprise!
 This is a picture of my handsome Ricos with my daughter, trainer Jennifer Truett of Dancing Horse Farm, Lebanon OH (www.dhf-oh.com) riding him. Since I mentioned him in reference to that IALHA poster, I thought I'd include his picture here. I like this picture so much, I use it as my desktop.
Back to the sculpture: Don't worry about the rider's face - right now her facial features are more "markers" than anything else. She doesn't look like herself at all yet! Her face is even a bit mashed because I grabbed her head and changed the angle of her neck and head from the side (they were too far back). Her arms and hands haven't been worked on at all yet. I'll get to them, don't worry!
A lot of sculpting (the way I do it, anyway!) seems to be "take two steps forward, three steps back" at times. As I work around the piece, I may find that something that looked and measured right before is now too long or too short in relation to some other part and the reference material. Just by bending one leg of the rider down so it laid properly along the horse's side changed the way it looked lengthwise, so I had to make some adjustments. That kind of thing happens frequently. Just one of the many challenges of 3-D work!
The little lump of clay on the horse's neck is a sign of my eagerness to get to the mane and tail. They're some of the last things I do on a sculpture, but they're also FUN so I'm eager to get to them. But it's too soon, so I was just messing around and left it there.
I'm pleased with the progress so far. Yay!
The saddle is supposed to be an Icelandic saddle. In addition to looking at the photos I took of my client's two saddles, I researched them online and found quite a wide variation in how they look. I'm going with the English show saddle look rather than the quilted seat I found on several Icelandic saddles simply because it's less distracting visually to have a smooth seat rather than a quilted one. I will probably cut the flaps a little shorter - they look too long in comparison with the rider's leg.
I've had to redo the cantle of the saddle about five times now, trying to get it placed right and to make it fit the horse and rider both as well as possible. I think I'm about there with the cantle. Now I'm working on the length of the rider's legs and the shape of her boots. I realized I had cut the wire too short on one leg and had to add some wire to have a good support for her foot. That's why I'm posting these pics today, to show you how I did that repair.


I'm having to fight my dressage training in positioning the rider. She doesn't ride dressage nor do other Icelandic riders (with a few exceptions I know of), so putting her in a dressage position would be wrong. I haven't had this much trouble positioning a rider in a long time - I guess that shows my dressage training is becoming ingrained! But I need to be careful about that with my art. Not all riders ride dressage.
That gorgeous picture behind the sculpture is the International Andalusian & Luisitano Horse Association (IALHA) poster from a couple of years ago featuring the gorgeous stallion, Santiago. His mane really does reach down past his knees and he seems to have a lovely disposition. I was fortunate enough to see him at the Midwest Fiesta in 2008 and was given one of these posters then (I had my art booth there marketing my art while I was working on the original of "Feather," which is an Andy stallion now available in bronze). I had no idea at the time that within a few months of that show, I'd have my very own half-Andalusian (El Paso Aricos, my dressage horse). Surprise surprise!

Back to the sculpture: Don't worry about the rider's face - right now her facial features are more "markers" than anything else. She doesn't look like herself at all yet! Her face is even a bit mashed because I grabbed her head and changed the angle of her neck and head from the side (they were too far back). Her arms and hands haven't been worked on at all yet. I'll get to them, don't worry!
A lot of sculpting (the way I do it, anyway!) seems to be "take two steps forward, three steps back" at times. As I work around the piece, I may find that something that looked and measured right before is now too long or too short in relation to some other part and the reference material. Just by bending one leg of the rider down so it laid properly along the horse's side changed the way it looked lengthwise, so I had to make some adjustments. That kind of thing happens frequently. Just one of the many challenges of 3-D work!
The little lump of clay on the horse's neck is a sign of my eagerness to get to the mane and tail. They're some of the last things I do on a sculpture, but they're also FUN so I'm eager to get to them. But it's too soon, so I was just messing around and left it there.
I'm pleased with the progress so far. Yay!
Saturday, November 07, 2009
The New Armature, step by step
I live in Ohio but my bronze foundry is in Oregon, which means I have to make my armatures very strong in order to withstand shipping that far. Remember, UPS doesn't pay any attention when a box is marked "UP" or "Fragile"!! If it won't withstand a drop of four feet onto concrete they won't pay for damages, so my pieces have to be built and packed as well as possible.
Because this piece (working title: "Tolt") is so large (25" high by 28" long, IIRC), I don't think the normal aluminum armature would be strong enough, so I did a slight variation on Karen Kasper's type of armature. I used a galvanized pipe screwed into a floor flange on the bottom and BOLTED, not screwed, to the working surface so it won't break loose in shipping (that happened once - it was a nightmare but the piece was saved anyway!). A galvanized T is put on top of that - I'm using 3/8" pipe here. I used two 45 degree "street elbows" on the T, which is the beginning of Karen's style of armature. I used 1/4" thick copper wire for the basic framework and the brace for the neck. Instead of dipping the armature pieces in wax as Karen does, I put the warmed wax on with a putty knife. The surface is lumpy but that shouldn't be a problem.


Classic comes in 12 lb. slabs. I get my husband to cut it in thin slices with a machete - honestly that's the best tool for the job, we've found after a lot of experimenting. If the slices are too thick for me to manage easily, I run them through a pasta machine (with the noodle cutter removed) to condition, thin and soften the clay.


Because this piece (working title: "Tolt") is so large (25" high by 28" long, IIRC), I don't think the normal aluminum armature would be strong enough, so I did a slight variation on Karen Kasper's type of armature. I used a galvanized pipe screwed into a floor flange on the bottom and BOLTED, not screwed, to the working surface so it won't break loose in shipping (that happened once - it was a nightmare but the piece was saved anyway!). A galvanized T is put on top of that - I'm using 3/8" pipe here. I used two 45 degree "street elbows" on the T, which is the beginning of Karen's style of armature. I used 1/4" thick copper wire for the basic framework and the brace for the neck. Instead of dipping the armature pieces in wax as Karen does, I put the warmed wax on with a putty knife. The surface is lumpy but that shouldn't be a problem.


I built up softened wax (warmed in a baking pan on top of an electric griddle set to 200 degrees at first, then lowered to "warm" when the was started to get warm) to bulk up the form and strengthen the armature. I'll still be able to move the armature a little bit once I get that done, but it won't be long before it will be locked in place. I'll make adjustments as I add wax and clay.

The bump and dip in front of the tail (to the left) indicate where the horse's buttocks should end. I hope you can see that I stopped short of building the wax that far back. I did that to allow room to install the leg armature (that comes later with this type of armature) and to insert toothpicks for the length and width of the back of the horse. Toothpicks don't insert into wax well.

I use an oil-based clay called plastilene (some brands are marked "plasticene"). This brand is Classic Clay, and this is the soft, tan version. They have a chocolate brown clay as well, but I can't see detail in it as well as I can in the light clay. I have carpal tunnel, so soft clay is much easier on my hands.
Shown above is another softening method - a light bulb shining on the clay. I often use a Styrofoam cooler with a light bulb inside it (15 watts - it doesn't have to be high wattage) with the sliced clay in trays stacked in the cooler. This softens the clay so it's malleable and easy to apply to the armature.

Here I've laid clay over the wax and pressed it in hard. If you don't press it in, you'll get soft spots that may sink later on, so if you can't press it with your thumbs or hands, use a wooden tool to press it in well. Unlike water-based clay, it won't damage the clay if you have air pockets, because this clay is never fired. (Water-based clay with air pockets in it usually breaks in the kiln.) I've included the pop can on my sculpture stand so you can get an idea of the scale of this piece.

This is the view from the front. I'm building up the silhouette of the horse and will insert toothpicks to show me how thick I need to make the various parts. Each of my sculptures is made to measure, an actual scale model of the horse, until I get about two-thirds of the way through sculpting. Then I let the art take over and the horse may not be to scale anymore, but he will be more dynamic and lifelike than he would've been if I'd stuck strictly to the measurements. Other people can do scale models that turn out beautifully, but that's just not the way I work. My pieces are more like an impression of reality than tight reality. I don't do a lot of veining because the horse is normally in motion, and you can't see the veins clearly on a moving horse. I figure the veins being detailed stops the motion of the horse, so I don't do them except the big Y-shaped one on the face, and I don't always include that.

Here you can see the layers of clay I've added on teh back and near the bottom of the chest. I will press them together with a wooden tool then blend the edges with my thumbs or a tool. The toothpics are markers showing where I'm going - how thick each part needs to be. There are none on the head and neck because I'll do those later.

Here the little Icelandic mare is built up some more - yes, her back is not shaped right, but I'll get there, don't worry! She will have a saddle and rider, so I don't have to be as careful with the shape of her back as I would for a "nekked horse" :D (a horse at liberty).

She's gotten thicker side to side as well as vertically. I will start building her thickness after I get her silhouette roughed in at about the right size.

Showing the layers of clay I've added to her neck and head. I'm not worrying very much yet about getting their shape right - I'm just laying on clay in an approximation of the way it should be. Once I have the body bulked out to the end of the toothpics, as it is on her back, chest and rump right now (that's why you don't see those toothpicks anymore - they're surrounded by clay), I'll make sure the clay is well pressed-on, then I'll beat it with a small board (a 1" x 1/2" works for me) to compact it (yes, I will!). I'll smooth it out with my thumbs and with tools and then I'll get serious about shaping it the way it should be to be the horse I'm sculpting.
If you have questions, feel free to ask me. Please don't post this anywhere without giving me credit - this page is COPYRIGHT Lynda Sappington 2009 and will be used both on my website (Equine Art by Lynda Sappington) and in the third edition of my how-to-sculpt book, "Sculpting 101: A Primer for the Self-taught Artist" Second Edition (available from me as well as The Compleat Sculptor, NYC, various libraries, Amazon.com and other bookstores).
I will be teaching a sculpting workshop in New York next May (see sidebar for info). I won't be teaching how to make this particular armature, but the lessons will be similar - some demonstration, some explanation and as much personal help as needed. If you'd like to try sculpting or would like to improve your skills, come to my workshop!
Friday, October 23, 2009
Sculpting Workshop with Lynda Sappington
May 21-23, 2010, 9AM to 5 PM, $250 for the 3 day workshop at Marienthal Country Inn in Eden NY (near Buffalo), a Bed and Breakfast that's offering a 30% off any room for students. Rooms start at $30/night. The workshop will be held in a converted church that's on the property. For details, see www.MarienthalCountryInn.com
When you get to that site, click on the "workshops" link at the top. The info on my class isn't on there yet, but should be by Monday Oct. 26. However, the application will work with or without my class info being on the page, so feel free to go ahead and sign up! Class size is limited to 15.
In the workshop, we'll cover building armatures, measuring the subject (horses, but the same principal applies to other subjects), how to work with clay and building the sculpture. I will discuss mold-making and casting resin and bronze, but there won't be time in this class to do any mold-making or casting.
If you want to get a head start on the class, order my book, "Sculpting 101: A Primer for the Self-taught Artist" by contacting me at Lynda@TheSculptedHorse.com.
I hope to see you there!

Subscribe to:
Posts (Atom)