Showing posts with label work in progress. Show all posts

Wednesday, May 09, 2012

New Works in Progress

I always work on something when I'm in a booth at a show.  At Equine Affaire, with four 10 hour days to be in my booth, I get a decent amount of work done while talking to folks.  Sculpting during a show is a great way to teach people about the process of creating sculpture.  This time, I also had a digital picture frame doing a slide show of the Nanning sculpture being digitally enlarged.  That gave me even more educational material to show the process of going from idea to finished  bronze.

All that said, I started a small sculpture of an Andalusian stallion doing a levade (a 45 degree rear that's held for a few  moments - part of "haute ecole" or "high school" dressage.  It takes incredible strength to hold that position).  Several years ago, I was allowed to photograph the spectacular Andalusian stallion Alborozo at his home in Malibu.  His owner, Avi Cohen, put him through all his paces and let me take all the photos I wanted which was incredibly kind and generous of him.

When I started this sculpture at Equine Affaire, it was nothing but pipe, a board and some spools of wire.  I made an armature (metal support for sculpture) and started adding clay, building him up and working on his muscle masses.  I haven't started work on his legs yet, as you can see in the pics below.  The tail is short like that because the horse's tail is tied up this way so he won't step on it while performing.

This is where he is now:


My second new work in progress is a relief of a lovely mare that's an Arab/Welsh cross.  She's a palomino with a wide blaze.  I saw her pic on Facebook (she belongs to an online friend of mine) and asked if I could sculpt it.  She agreed and I started on it, but life got in the way and I had to leave it unfinished for quite a while.  Now I'm back at work on it and it's an intriguing puzzle to solve.  It's a difficult angle to do as a relief, which is one of the reasons I wanted to try it (silly me!).  This is one of those things we self-taught artists do - find a new challenge and fight our way through it as a way of increasing our skills.  So this piece will go through some serious cases of "the uglies" before it becomes the beautiful piece I see in my head.  Anyway, here she is along with the photo that inspired me.  It'll get better, trust me!


Thursday, August 25, 2011

Digitally Enlarging the Maquette to Life-Size


Yes, I published this post in August.  I was going to send it to a friend and discovered the formatting had gone all wonky!  So I'm fixing it and re-publishing it.  The bronze is finished now and will be installed in April!  YAY!

* * * *

My life-size piece is being cast in bronze now. I can't wait to see it!! My husband and I went to Oregon for 9 days for me to work on the enlargement to make sure it was exactly the way I wanted it. My customer came out in the middle of the week to see it and make sure it was how he wanted it too. It passed both of our inspections by the end of the week! 

 The digital enlarging method ROCKS! First, the piece is scanned by a computer, then it's cut out by a 12' long 7-axis robotic arm (like the kind used in the auto industry), then clay is applied and ART happens! The scanner doesn't get into tight spots, so there was a curve that attached the testicles to the gaskins, instead of the line of separation that should've been there, but it was EASY to carve out the Styrofoam and touch up the area with additional clay. The horse's buttocks and tail created such a shadow, the scanner missed scanning the rectum completely, so I had to add that to the life-size, which again was no big deal. The enlarging place has a whole staff of people with degrees with  sculpting working on the piece along with me, my husband and even my customer (who said I was like Tom Sawyer, getting everyone to work on it, LOL!) 

 When you go from maquette to life-size, any tiny errors in the maquette will show up as large errors (the life-size in this case is 700 times bigger than the maquette). Thankfully, no errors showed up once it was enlarged except for one ear not being set quite as straight as I wanted it to be (on the maquette, it looked fine, so it really was a small error). With help from the crew (since I didn't know how to do it), I cut the Styrofoam ear off, put it at the angle I wanted, secured it with a pointed dowel rod, then squirted glue under the gap. It's a foaming kind of glue from a caulking gun, so it expands and fills gaps. It's also easy to carve or rasp off if it's in the way. The dowel was hammered farther into the foam so it would be easy to pull out, then removed. Voila! Perfect ears!! The scanner made the edges of the ears and nostrils too thick because of its inability to "see" sharp edges like that. No biggie. I carved them off with a bread knife, then built up the clay to what I wanted. 

Once the piece was fully assembled and all the finishing work done, it was cut into pieces to be sent to the foundry for casting. I worked from 8-5 for a week (and my shoulder didn't hurt much at all thanks to a cortisone shot the previous week!) It was hard work but I learned SO much!!!! And the piece is GORGEOUS! (Not just my humble opinion, either! LOL) The 12' long 7-axis robotic arm that's shown in the pictures can do a two day job in two hours! That's pretty darned amazing! You might notice in the following pictures that the edges of the hooves weren't as "crisp" as the edges of real hooves are. That was due to the way the machine cut them out. My customer fixed the hoof edges for me - I asked him to add that clay and he got it in really good shape himself before I came along and did the fine tuning.  He sure enjoyed himself, and he'll be able to point to certain parts on the bronze and be able to tell his friends that he did that!  I think that's great!  :) 

This was a FABULOUS experience for me!  I hope I get more life-size commissions so I can go through this process again!

Below you can see the robotic arm cutting out the head and neck - the horse's face is to the left and the back edge of his neck to the right. This is the same kind of Styrofoam used to insulate office buildings. It comes in 8" thick blocks.


The computer split the scan of the legs and tail in half lengthwise.  These parts are being cut out on this router table and will be glued together later.


Below is one of the master sculptors who works at the enlarging shop, working on the detailing of the mane. In the life-size, the details I put in the maquette's mane and tail weren't dynamic enough, so clay was added to make them a better size for the life-size. The sculptors there can do all the work for the original sculptor, either at their direction or without them even being there. Apparently I was unusual because I jumped right in and worked alongside them, which made sense to me - it's MY piece! My hands needed to be in every aspect of creating it!


Yeah, I'm happy with it! Awed by it, actually. It's amazing - and HUGE! Eight feet tall by 9 feet long without the cart it's mounted on at the moment.


I wish my parents were alive. It would be such a kick to be able to send this photo to them and say, "Look what I did!" :) I know they'd hang the picture on their fridge.


Monday, May 02, 2011

Updates on "Tolt" and "Nanning"

"Tolt" is in metal!  I got some "approval pics" from the foundry last week.  There are a couple of things I want them to fix (the reins should not be looped up above the rider's hands, and the stirrups are too far back on the feet), but overall, it's beautiful!! 


The maquette of Nanning is coming along well.  I've added hair to the tail and have started putting clay on for the mane, but the clay for the mane isn't "installed" yet.  It's just lying there on the surface in strands much too thick for the finished version because right now, I'm just working out the movement of the mane.  Once I've figured out how I want it to be, I'll thin those strands and make sure they're well-attached to the sculpture, as well as having mane on both sides of the neck..


I enjoy working on the "hairy" parts of horse sculptures.  That's where I can get more creative with it.  I think he's going to be gorgeous!!

Saturday, January 29, 2011

Sculpting with Gloves On and Other Adventures

I'll bet you read that title and said, "Huh???"  LOL.  Read and learn!

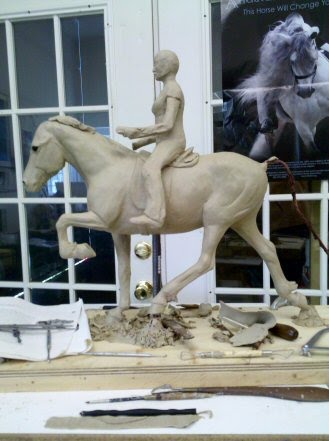
I got a "rush job" yesterday, a trophy job that involves me sculpting a relief of a jumper.  After I sculpt it, I'll make a mold and cast a resin of it, then finish the resin to look like bronze.  The problem is, the trophy has to be finished and in their hands by the end of March.  That isn't much time to get such work done, but fortunately for me and the customer, the big piece I'm working on requires a lot of "down time" while the clay is softening in the crock pot, so while the clay is becoming soft enough for me to use, I have time to work on other projects.

I'll back up and explain a bit here.  I'm using a crock pot as a double boiler to soften the Classic Clay Hard that I'm using on maquette for the life-size bronze I'm working on (I'll call it "Nanning," the real horse's name, to keep things simple).  It takes a while for the clay to soften even with the crock set on "high," so while it's warming, I have time to work on other things. 

I don't want to leave the crock plugged in and turned on while I'm not in the studio, so I don't turn the corck on and leave the studio while it warms the clay.  I've got the rider for "Tolt" nearly perfected and need to give that piece a couple of days of not being looked at so I can see it with fresh eyes before I do whatever touchups seem necessary.  Then I'll photograph it and send the pics to my client for approval.  I don't want to start working on the wings for the Pegasus I'm doing using "Feather" http://www.thesculptedhorse.com/feather.html as the horse's body because working on the wings takes both hands and my left shoulder is still sore and weak.  I don't have enough working room to get "Horseplay" out to work on while Tolt and Nanning are out.  With all my other current projects on "hold" for various reasons, I have time to work on this trophy relief while waiting for the clay to soften for Nanning.

My trophy customer sent me an excellent reference photo of a college-age rider jumping a nice hunter fence.  The background was very busy, with white vinyl fence behind the mostly white jump and people and a building there as well.  To  make it easier to see what I was doing, I cut the horse and fence out after printing the photo on my computer printer at the size I wanted to sculpt it.  To get it centered on the foamcore board I'm using as a working surface, I marked the outline of it on the foamcore.  This way, when I sculpt the piece, it won't be too far to one side or the other, and the mold will be much better as a result, with no possibly weak sides from being too narrow.

 Hopefully you can see the pencil outline on the foamcore above.  The cut-out reference picture that's been made the size I want it to be for the trophy is to the right.

Once I have the board marked, I start putting clay on the board to fill out the silhouette of the horse.  I will finish the horse first, then add the saddle, bridle, reins and rider (not necessarily in that order), and will build the jump and the bushes on either side of it last.

The trick to doing good reliefs is to remember that the parts closest to the viewer need to be the highest.  That seems like something that should be simple to do, but it isn't as easy to do as you might think.  Consider this horse's back legs.  The left hind leg is nearest the viewer.  That one has to be the highest.  You'd think the right leg would be the next highest thing, but this is a gelding and his sheath is showing, so the sheath has to be the second highest level and look as if it actually belongs between the back legs.  The right hind leg will be the least high.  The "least high" part still has to have a decent amount of depth top to bottom (as you look at the clay, not top to bottom of the leg) so the resin will pour well and the resulting piece won't be too thin and warp.  I have to be sure even the thinnest parts of the relief will pour well and be thick enough to be strong, but not so thick the piece loses its graceful appearance.  That's a trick in itself.

In the picture below, I've done about 45 minutes of work on the piece (with a couple of breaks to check on the clay in the crock).  You should be able to see the definition and different levels of the two back legs and the sheath.  The back legs, rump, top of the tail and the back part of the belly are all in pretty good shape now, although I need to detail the legs, of course.  I'm making this using the Classic Clay Soft I normally use.  I like it because I can push the clay around to get the various shapes needed without a lot of work, so my hands don't tire so easily.


The photo shown on the left above is the full photo.  It's about 1/3 bigger than the one I'm using for the sculpture.  You can see how the white vinyl fence behind the jump is distracting to the eye.  Having it cut out makes my job go faster - it's a nice shortcut. 

This is a *great* reference photo.  Having a straight-on, crisply focused profile shot where the camera is level with the center of the horse's body mass makes life a lot simpler for me, especially when I need to do a rush job. 

While I worked on the jumper, the clay in the crock turned to mush - I should've checked it more often.  As a result, I wound up "frosting" Nanning as if I were frosting a cake!  That was interesting!  I used a putty knife to apply the clay to bulk him up and tried to press the clay in place with my fingers.  It didn't take me long to realize I needed to get smarter about working with that hot clay.  First I took the lid off the crock so the clay would cool a bit.  That helped, but not enough.  Then I took the glass bowl the clay was in out of the crock and set it on the table beside me.  Within a few minutes, it had cooled enough to be easier to work with, but it was still hot on my hands.


Above you can see the crockpot on the left, a plastic box behind it with a red lid - that's where the sliced clay is stored - the plastic cup I used to bring more water to the crock today (there's no water in the machine shed where my studio is).  On the right of the sculpture are the tools I'm using on this one so far: the putty knife I'm using to put clay on (sometimes frosting the sculpture, LOL), a large wooden tool that I use to both press the clay tightly to the existing clay and to carve the piece a bit, and some smaller tools I haven't needed yet.  The Friesian on the bulletin board to the left in the background is not Nanning - it's just one I liked when I first started sculpting.  I never have sculpted that horse.  This is my second sculpture of Nanning (he's the horse pulling the carriage in my bronze, "Friesian Elegance" http://www.thesculptedhorse.com/Elegance.html).  The Friesian mounted on the blue Styrofoam directly behind the sculpture is Nanning 374.  In this photo, you can see the clay was laid on in rough "swooshes" - this is when the clay was too soft and I was actually "frosting" the sculpture.  It all worked out okay, don't worry!

I got the bright idea to use vinyl gloves to apply the hot clay.  The glove you can see in the pic below is a "chemical barrier glove" I use when making molds and doing other stuff with chemicals that might irritate my skin.  It's leaving interesting alligator-skin-like impressions on the clay, but that won't last.  I'll be carving this clay down with sharp tools, either heated or after having used a hair dryer on the clay to soften it (hard clay really requires a different working method than usual!) and you'll never know Nanning looked this rough or had alligator skin at any point in his construction, LOL!


As you can see in the photo above, I put a piece of clay on and smooth it out, filling in depressions and gaps with it as much as possible.  Eventually, the sculpture will be smooth and elegant and will look like the well-muscled horse it represents - it's still in the "uglies" stage for now.


This is the best way to measure with calipers - you don't put the curved tips toward each other but AWAY from each other so your eye won't be fooled by the curve in the legs of the caliper.  Here I'm measuring the length of Nanning's body.  

This reference photo isn't as easy to use as the jumper's because the horse isn't in straight profile to the camera.  His body is actually bent, so his shoulder is fairly straight to the camera, but his rump is in 3/4 view.  There are reasons for him being in this position, but the simplest explanation is that he was playing and horses do unexpected things while playing.


This is what the far side looks like when you've been adding clay from one side without turning the piece often.  The clay is still very soft, so the slabs are going on well and are smoothed out on the horse's left side, but they look pretty weird on this side, don't they?  Don't worry, I fixed it. 

Note the toothpicks sticking out of his point of shoulder and point of buttocks above.  They are there to show me how much he needs to be bulked up.  The clay should be built up until the top of those toothpicks are even with the clay.  I have a way to go, don't I?  :)


After adding more clay and blending it in, pressing it so it will be hard and strong and there won't be any "surprises" (depressions where there shouldn't be depressions) in the future, and adjusting the armature a bit (I moved his tail and two of his legs - in pressing the clay on, they got out of place a bit), this is the result.  His neck is too thick and his body not thick or long enough, but my hands and shoulders aren't as strong as they were prior to surgery, so I have to stop here for now.  Thankfully, I'm getting stronger and gaining stamina every day - it's just taking longer than I want it to! 

I'm happy with where Nanning is now.  I could see the "portriat" emerging from the beginning, but I'll bet you can start to see it now.  If you noticed the working board is up on something else, I have a 2x6 under it at the moment that has a turntable on the bottom, so it's easier for me to turn the piece to work on it.  When I get "Tolt" off my big sculpting table and no longer need to use the crock pot to soften my clay, I'll move Nanning to the sculpting table.

That's it for now!  Hope you learned something interesting from me today!


Monday, August 30, 2010

All but the Signature . . . I hope!

I think "Tolt" is nearly finished.  I just have to clean up the clay, make the pads under the horse's feet more uniform in shape and sign the title, my name and copyright along the sides of those pads.  Then I have to clean all that up too.  (Signing sculptures is a pain - nowhere near as easy to do as signing a painting!) 

I've spent literally two to three weeks pondering and picking at and trying to sculpt the rider's hands until today when I finally got everything to work the way I wanted.  It's very hard to sculpt the part of the fingers and palm that are near the horse, so I finally turned the forearms and hands out away from the horse so I could see the inside shapes better.  There are suggestions of fingernails there and even my customer's gorgeous sapphire ring is shown as a general shape on her left hand.  Her arms and hands were hard for me to do - getting the muscling and the shapes of the parts right is quite a challenge, but I think everything's good now.

I like the way the wrinkles turned out in her shirt and breeches.  I textured her clothing to make it look different from her skin when it's bronze.  I think it will be a nice look to have that slight texture on the cloth.

The clay stirrups you see on the working surface won't be the ones used.  I made Super Sculpey ones so they'll be sturdier to ship (Super Sculpey is a polymer clay you can bake in the oven so it's hard, unlike plastilene which is always soft.)  The stirrups, stirrup leathers and reins will all be hand-made at the foundry for each piece, although they MAY be able to cast the stirrups.  I'm not sure if they're thick enough to cast well unless they use jewelry-type casting (centrifugal casting). 

Without further ado, here are the pictures!

The shape behind the hoof is supposed to be a splash of dirt.  I may change it a bit before declaring a victory on this piece.
When I saw this pic, I realized I need to add a browband.  I'll do that tomorrow.

  I'll be glad to get this one finished!  I've been working on it a long time, but I'm happy with how it's turned out.

Tuesday, July 06, 2010

Ahhh, that's better . . . "Tolt" and "Star Sons 2" news!!

I finally saw what was bothering me about the rider's face.  I knew something was a bit off, but I couldn't quite figure out how to fix it.  Then I saw it.  The eyes were set too high (by about 1/16th of an inch), and the place where the nose dips in toward the eyes was set in the wrong place (by an even smaller margin).  So today I put dabs of clay in the places where the eyes were, smoothed that out and started over - not my favorite thing to do, especially on something as delicate and difficult to create as the eyes on this rider.  But I did it, and revised the shape of her cheekbones somewhat, her temples and browbone, the nose, and even brought the brim of the helmet lower and trimmed some off the top of the helmet.  I like it a lot better now.  I think I need to broaden the lower cheeks and jaw just a tiny bit on each side, and then it just might look like my customer!  YAY!  Here are some pictures to show what I accomplished today.

I know her helmet still needs straps, but I'm not going to add them until I'm satisfied with her face.

As you may be able to see from the pictures above, and will certainly see in the picture below, I also started working on the mane, getting the masses of the flying mane and forelock somewhat defined on one side, as well as filling in holes and undercuts so it will cast well.

I think this will be a beautiful piece!  I'm excited to see it coming together so well!

In other news, I've finished the revisions on my second "Star Sons" novel (titled "The Gathering Alliance") and am printing it out right now for a final read-through to make sure I haven't missed anything in proofreading.  The cover art is finished and there are only a few details to complete before it will be ready for publication.  HUZZAH!!!  I'll post ordering info here and on Facebook and my Yahoo groups when it's ready to go.  It will be available from me as well as from Amazon.com, BN.com and various other outlets. You will also be able to order it in your local bookstore with its ISBN number.  I'm excited to have this finished!  YAAAY!!

Thursday, June 03, 2010

Progress!

It finally looks like I'm getting somewhere on this piece!  A lot of the previous work has been painstaking and tedious, trying to get the horse built properly, making sure there are no dips or bumps where there shouldn't be, and making the horse a functional being with all the joints in the proper places, etc.  Now I've added a saddle and the rider.  The rider will be removed for shipping - she's only attached by a couple of wires sticking out below her seat bones into the horse.  She'll be welded or soldered in place by the foundry when this piece is cast in bronze.

The saddle is supposed to be an Icelandic saddle.  In addition to looking at the photos I took of my client's two saddles, I researched them online and found quite a wide variation in how they look.  I'm going with the English show saddle look rather than the quilted seat I found on several Icelandic saddles simply because it's less distracting visually to have a smooth seat rather than a quilted one.  I will probably cut the flaps a little shorter - they look too long in comparison with the rider's leg.

I've had to redo the cantle of the saddle about five times now, trying to get it placed right and to make it fit the horse and rider both as well as possible.  I think I'm about there with the cantle.  Now I'm working on the length of the rider's legs and the shape of her boots.  I realized I had cut the wire too short on one leg and had to add some wire to have a good support for her foot.  That's why I'm posting these pics today, to show you how I did that repair.

I've cut off the clay at the bottom of her leg, exposing the wire.  I then attached a lighter wire, wrapping it securely around the existing wire of the leg, using pliers to help me get it as tight as possible.  After wrapping it several times around the larger wire to make it as secure as possible, I started twisting the wire to both strengthen the wire and to give the clay something to bite into so it won't slide around.  (Aluminum wire is slippery to clay if it isn't either twisted itself or isn't wrapped around another wire.)  I doubled the twisted wire (shown above) back on itself and twisted it some more to make it stronger (not shown), then added clay over that to make the new foot.

Here's a closeup of the wire before I folded it back on itself and twisted it again.

Here's the other side of the piece.  This leg is actually a bit too short too, but there's plenty of wire there.  I'll pull the clay off the foot, straighten the wire for a short distance to lengthen the leg, then bend the end up to support the foot and add clay to make the boot again.

I'm having to fight my dressage training in positioning the rider.  She doesn't ride dressage nor do other Icelandic riders (with a few exceptions I know of), so putting her in a dressage position would be wrong.  I haven't had this much trouble positioning a rider in a long time - I guess that shows my dressage training is becoming ingrained!  But I need to be careful about that with my art.  Not all riders ride dressage.

That gorgeous picture behind the sculpture is the International Andalusian & Luisitano Horse Association (IALHA) poster from a couple of years ago featuring the gorgeous stallion, Santiago.  His mane really does reach down past his knees and he seems to have a lovely disposition.  I was fortunate enough to see him at the Midwest Fiesta in 2008 and was given one of these posters then (I had my art booth there marketing my art while I was working on the original of "Feather," which is an Andy stallion now available in bronze).  I had no idea at the time that within a few months of that show, I'd have my very own half-Andalusian (El Paso Aricos, my dressage horse).  Surprise surprise!
This is a picture of my handsome Ricos with my daughter, trainer Jennifer Truett of Dancing Horse Farm, Lebanon OH (www.dhf-oh.com) riding him.  Since I mentioned him in reference to that IALHA poster, I thought I'd include his picture here.  I like this picture so much, I use it as my desktop.

Back to the sculpture:  Don't worry about the rider's face - right now her facial features are more "markers" than anything else.  She doesn't look like herself at all yet!  Her face is even a bit mashed because I grabbed her head and changed the angle of her neck and head from the side (they were too far back).  Her arms and hands haven't been worked on at all yet.  I'll get to them, don't worry!

A lot of sculpting (the way I do it, anyway!) seems to be "take two steps forward, three steps back" at times.  As I work around the piece, I may find that something that looked and measured right before is now too long or too short in relation to some other part and the reference material.  Just  by bending one leg of the rider down so it laid properly along the horse's side changed the way it looked lengthwise, so I had to make some adjustments.  That kind of thing happens frequently.  Just one of the many challenges of 3-D work!

The little lump of clay on the horse's neck is a sign of my eagerness to get to the mane and tail.  They're some of the last things I do on a sculpture, but they're also FUN so I'm eager to get to them.  But it's too soon, so I was just messing around and left it there.

I'm pleased with the progress so far.  Yay!

Saturday, May 22, 2010

Details, details, details . . .

Now I'm at the point of building the saddle on the horse and making sure it fits the rider.  The rider is nowhere near perfect yet, but she's about as thick as she's going to be front to back (this is a petite middle-aged rider).  I  may need to adjust the length of her legs once I get back to work on her, but for now, I'm just getting the saddle assembled and placed where it should be.  I know I need to get her body more proportionate and to get her sitting on her seat bones.  I'll get there eventually.

At first, I had the saddle a bit long for this rider - If you look carefully, you should be able to see I've just cut the clay at the back of the cantle so it fits the rider better.  I've just turned a bit of clay over to fill in some of the seat behind her, actually, and then put a cut behind the cantle as a marker for when I get back to work on it.

You can also see I've put feathers on three of the legs now, and those legs have also developed muscles, bones and tendons.  I've put a bit of clay on the neck as well, starting to plan out the movement of the mane.  The strips of clay ahead of where the saddle's knee rolls should be in the picture below are just extra pieces I haven't trimmed off yet.  I've only developed the saddle on the left side and a bit on top.  The right side will be done tomorrow.


Here are some detail shots of the horse and rider. 

Don't worry, her ankles and feet will be straight with no wire sticking out of them when I get finished.  For now, this is very much a work in progress.  The knee rolls are just being developed and will be shaped better before I declare a victory over them.

I'm pretty pleased with how it's coming along.  Hope you enjoy seeing its progress!