Showing posts with label art. Show all posts

Monday, September 29, 2014

Anton

I've been working on this commission most of this year - well, "pondering" quite a lot of that time rather than actually sculpting.  One problem is, the horse has only one leg on the ground, which isn't enough support for the sculpture.  The other big problem was, how do I translate that massive clump of hair (his mane) that's lying on his side into a flowing form that will look good and be reasonable to clean up, rather than looking like a tangled mess?  Thankfully, I've solved or figured out how to solve those problems.

Here's the pose photo, a gorgeous picture of the Friesian stallion Anton by world-renowned photographer Gabrielle Boiselle.
Ms. Boiselle kindly gave permission for me to sculpt this pose, for which my customer and I are very grateful.

Looking at the picture, you can see my problem with only one leg being down.  There's a tremendous amount of weight ahead of that leg and not that much behind, so it won't "balance" on that leg.  There needs to be another leg attached to the ground for support, so that other hind leg will be shown as moving through a tall clump of grass.  I'm not at that point in sculpting yet, but I'll share it when I get there.

First, I had to build the horse and get him fairly finished before adding the hair.  I've just started laying on the clay for his tail here and having started the feathers yet.  His eyes are ball earrings, in case you wondered.  It's easier for me to sculpt expressive eyelids if I have a hard eyeball to work with, rather than doing the eye in clay or wax.  And this way, the eye is genuinely round, not lumpy like a wax ball would be (at least in my hands - I don't work with wax as well as I'd like).

Early work on the mane and feathers.  Each leg is at a different moment in flight, so the feathers "fly" differently on each leg.  This horse has massive feathers as well as a massive mane and tail, so there will be a LOT more clay on him before he's "right" - and yes, that's a LOT of hair to sculpt!

At various points during my work, I get the piece off the base and hang it upside down so I can work on the underneath parts without turning myself into a pretzel (as I did for years before fellow sculptor Cathy Choyce told me about this method).  This is by far the easier part of this kind of work, since I can work with my arms at a normal level (as if I were typing). With most pieces, I work with the horse's back supported by my legs, but with that mane in the way, Anton has to hang free. Him hanging free means I have to brace him with one hand while sculpting with the other, which can be difficult at times, but still, it's a lot easier on my shoulders and back than leaving it on my usual sculpting stand and trying to twist my body to see underneath him!

For those who haven't seen this setup before, the chain slides through a hole somebody put in the joist overhead such as pipes would go through. (In my previous studio, I had an eye-bolt attached to a joist in the ceiling.)  I have carabiners and S-hooks holding it where I want it. I keep a spare plumbing T on the chain so I can unscrew my armature from the working surface and screw it to the T to hang the piece upside down. I sit in the black chair with the necessary tools and some clay on the wooden stool beside me at a comfortable height.

You can see my normal sculpting stand to the left of that photo and the drafting stool I normally sit on. The stand is adjustable by turning a crank which raises and lowers the top. This stand was worth the cost, as often as I change the height of my stand. My old stand was one of those where you insert a pin in the support pipe at various heights, but you have to LIFT the top to the place where you want it. I still use the old one at times. I don't throw much away . . .


This pic shows what I need to work on (as well as how much work I've done on the feathers). The hooves need to have the details (wall, sole, frog, heel bulbs) added, and there are holes or voids in the clay here and there (look at the tail and feathers for examples) that need to either be blended or filled so they won't catch the mold material and possibly tear the mold. I also need to smooth out his belly and other parts. By hanging him like this, I can make sure everything is blended, filled in where necessary and sculpted properly. After I hung him up I noticed the bone in the forelegs didn't show correctly, so I fixed that as well as a bunch of other stuff.  Changing your point of view is always helpful in perfecting an artwork.  I also use a big wall mirror to see it with fresh eyes.

All that hair means there are lots of undercuts. Undercuts are fine in bronze to some extent, but again, I have to fix anything that might trap the mold - voids or undercuts that get larger "inside" or "under," for instance. Silicon molds are very forgiving, but there's no point in tempting fate by leaving such things that can be repaired. Sculpture is about light and shadow, so there will be some places that LOOK like undercuts, but they will be angled inside the cut to allow the mold to pull free smoothly.

Once I get the underneath parts fixed, I'll put him back on his working surface and glue the pipes in place - he won't be coming off there again until he's at the foundry. Then I'll add the grass under his feet and build it up to support that flying back leg, detail his tail, finish detailing his mane and forelock and sign him!! Then he'll be DONE and can go to be cast! YAY!

Once I get him upright again, I'll post some more pictures.  I hope this article was educational and entertaining!

Wednesday, January 09, 2013

Making Some Changes

Moving to a new home is EXHAUSTING but the living area of the house is nearly finished. We still have boxes to unpack in the office and we don't want to talk about the basement which is piled up with boxes waiting to be unpacked in my studio!  The majority of the living space is comfortable and we almost remember where we put things, which is great!  Yay!

Due to the move and how much longer it's taking to get things finished than expected, I'm going to cancel plans for an April workshop.  I'm not sure I'll be ready that soon, but I expect I will be ready for workshops and regular students by summer, so stay tuned!  Only you'll want to "stay tuned" via the blog on my website, www.TheSculptedHorse.com/blog.html.  I already have a post there catching you up on all my news. 

I will leave this blog up for reference sake, but future posts will be on my website's blog, so please follow me there!

Thursday, September 27, 2012

Date Change and a Sculpting Rant

Date Change:  Real life has gotten in the way and messed up my schedule, so my sculpting workshop is going to be in late April 2013, still at Dancing Horse Farm, Lebanon OH.  I'll post the exact dates soon, but it will be the 3rd or 4th week in April.

Now the rant!  Someone posted in the Sculpture forum on Wetcanvas that when he bought some Super Sculpey in a local art supply store so he could start learning to sculpt, the clerks there told him he was going about learning sculpting the wrong way - that he had to learn to draw and he needed to learn anatomy first.  Here's my reply:

Sculpting does not require drawing skills - I'm a prime example of that.  For those of us whose minds work in the 3-D realm, sculpting is far easier than 2-D work. People who don't think 3-D (which is the majority of artists) don't understand the way 3-D thinkers think, the way we see things, the way we relate to things - seriously.  And they believe you have to draw before you can do anything else in art.  They'll point to famous artists who were/are both painters and sculptors (Michelangelo, for instance).  Michelangelo considered himself a sculptor and claimed he couldn't paint (despite the evidence of the Sistine Chapel ceiling).  I'm the same way - I learned to draw *after* becoming a proficient sculptor and it is HARD HARD HARD for me to do 2-D work, but I can if I have to.  Don't let a 2-D artist's lack of understanding make you the least bit hesitant about sculpting.  Sculpting is in your hands and your heart and your mind and you'll be amazed at what you can create once you understand the materials you're working with. 

Now that I'm done ranting (for now, LOL!), I will say it's always good to learn anatomy any way you can.  However, learning it by DRAWING isn't necessarily going to help you with learning how to sculpt it.  You'll need to run your hand over the muscles of a horse or a smooth-coated dog (you don't want the muscles hidden by fur as they would be in a cat or long-haired dog) while its leg is being held in a flexed position, then study photographs done in excellent light of a leg in a similar position to see how muscles move under skin (for instance).  Studying anatomical drawings and even copying them if you can draw decently can be quite useful.  I use anatomy books with drawings all the time, but I mostly study anatomy in real life to do my art. 

You need to pay attention to how the body moves - for instance, have you noticed that when someone is walking, the leg bearing weight makes that hip actually higher than the other one?  (That's what makes women's rumps sashay prettily.)  If a group of muscles bulge, the same ones on the other side will be shaped differently.  I'm a horse artist, so I'll use horses as an illustration.  Muscles bulge the most when they're contracted, so when a horse is LIFTING (not standing on) his left hind leg, for instance, his rump muscles (and abdominals, etc.) will be bulging while the muscles on his right hind leg, the one he's standing on, will look flatter because they're engaged in supporting the body, not contracting to shorten or move that leg.  The more effort being expended, the more bulge you'll see in the muscles.  Muscles at rest are flatter and more relaxed looking than those being used to lift a limb.  If you haven't studied anatomy, you may not have consciously noticed such things, but they're also true in humans.  Most people don't have the muscular development or else they have too much body fat for the muscles to be defined the way I'm used to seeing them in horses, so I use upper level dressage riders (who are strong athletes and always have highly developed thigh muscles and lightly developed calves - which is a sign they're dressage riders rather than jumper riders or western riders - just a detail to be observed if you want to portray the sport properly) or dancers as reference, with the occasional body-builder thrown in for fun at times.  :)

There are 3-D anatomical models you can touch, move, light different ways to help you see anatomy.  I'm not talking about those wooden doll things you can pose to get proportions.  You can buy resin castings that are copies of Michelangelo's "David'"s ear, eye, nose, mouth, etc.  There are full-body anatomical models in resin.  There are some models that have half the man's body with skin over his muscles, and half showing the muscles with no skin.  You can get horse models like that too.  That's the way a 3-D mind learns anatomy, that and studying the real subject you're going to sculpt, whether people, horses, wildlife, etc.  (Suggestion - if you're going to sculpt wildlife, run your hands over taxidermied animals - good ones - rather than getting THAT friendly with a real cougar or whatever!  That's what I did to sculpt a cougar - it worked just fine.)

I "see" with my hands a lot. When I did my first portrait of a horse (rather than doing "imaginary" ones or ones based on reference photos), I asked the horse's owner to allow me to sculpt him from life once I had the piece fairly well along (I wanted to be sure I had the details and proportions right).  The horse was tied up and I put the 3/4 finished bust on a tall tack box near him.  I closed my eyes and ran my hands over that lovely stallion's head, then did the same to the 1/4 life-sized bust of him I was working on.  The resulting bust is easily recognizable as him by those who know him even without his huge blaze (a white marking on his face) that covers most of his face.  For people to recognize his bust that way rather than just thinking it's "just" a Quarter Horse is amazing to me since it was only my second attempt at a realistic horse and my first real portrait.  (Copies of that piece are still for sale on my website: Fascination)

Don't let shop assistants deter you from sculpting.  Get your hands in the clay (when using Super Sculpey, condition it first or your hands will get sore - it needs to be run through a pasta machine - rollers only, not cutters - several times to mix the oils in and soften the clay before you try to use it.  Pasta machines are about $25 and available at Hobby Lobby, Michael's, Dick Blick's, etc.).  Once you start working with the clay, your hands and innate knowledge will get you started on your first pieces.  Then you'll see where you need to improve your knowledge and skill and the rest of it will be a joyful path of discovery.  Let the 2-D people have fun with their paints.  We're creating art you can touch, feel and appreciate from all sides.  Good luck with it!

Wednesday, May 09, 2012

New Works in Progress

I always work on something when I'm in a booth at a show.  At Equine Affaire, with four 10 hour days to be in my booth, I get a decent amount of work done while talking to folks.  Sculpting during a show is a great way to teach people about the process of creating sculpture.  This time, I also had a digital picture frame doing a slide show of the Nanning sculpture being digitally enlarged.  That gave me even more educational material to show the process of going from idea to finished  bronze.

All that said, I started a small sculpture of an Andalusian stallion doing a levade (a 45 degree rear that's held for a few  moments - part of "haute ecole" or "high school" dressage.  It takes incredible strength to hold that position).  Several years ago, I was allowed to photograph the spectacular Andalusian stallion Alborozo at his home in Malibu.  His owner, Avi Cohen, put him through all his paces and let me take all the photos I wanted which was incredibly kind and generous of him.

When I started this sculpture at Equine Affaire, it was nothing but pipe, a board and some spools of wire.  I made an armature (metal support for sculpture) and started adding clay, building him up and working on his muscle masses.  I haven't started work on his legs yet, as you can see in the pics below.  The tail is short like that because the horse's tail is tied up this way so he won't step on it while performing.

This is where he is now:


My second new work in progress is a relief of a lovely mare that's an Arab/Welsh cross.  She's a palomino with a wide blaze.  I saw her pic on Facebook (she belongs to an online friend of mine) and asked if I could sculpt it.  She agreed and I started on it, but life got in the way and I had to leave it unfinished for quite a while.  Now I'm back at work on it and it's an intriguing puzzle to solve.  It's a difficult angle to do as a relief, which is one of the reasons I wanted to try it (silly me!).  This is one of those things we self-taught artists do - find a new challenge and fight our way through it as a way of increasing our skills.  So this piece will go through some serious cases of "the uglies" before it becomes the beautiful piece I see in my head.  Anyway, here she is along with the photo that inspired me.  It'll get better, trust me!


Wednesday, November 16, 2011

Marketing Your Art/Creating a "Brand"

Most artists are unaware that it takes about 50% of your time to market your art properly.  No agent, no gallery is going to market your art with passion and knowledge like yours (remember, they aren't working only for you!), so do it yourself and put that money you'd give an agent into your own advertising! 


As an artist, your name is your "brand name" unless you prefer promoting your studio's name.  Either way, it's a "brand" and that's a good way to think of it as you promote it. 

Building a "brand name" is a multi-pronged task.  You need a business card with an image of your work preferably on both sides (with some clear space left to write notes on if you need to - and all your contact info on one side).  ALWAYS carry a good supply of your cards with you.  I recently gave cards to a couple of people I was introduced to in church, when my friend included "She's a sculptor" in his introduction and then asked me to show his friend some pictures of my work.  Carrying cards is the first, simplest and one of the most important steps in marketing.  And try to always have at least some pictures with you, even if they're on your cell phone, as mine are (gotta love smart phones!).

You need brochures or fliers with pictures of your work - color, if possible (if I can afford it, I'm doing color next year!).  Don't do cheap-looking brochures (those printed on regular computer paper, for instance) or people won't consider your art to be worth much.  Use heavyweight, glossy or matte paper, but GOOD paper to make the best and most memorable impression.

You need a Website - not just a Facebook page.  People looking for artists don't look on Facebook, they search the Web.  Google won't find your art on Facebook, just your posts, but it will find your Website if you build the meta tags right! 

All your promotional materials - cards, brochures, website, etc. - need to be similar in style.  Perhaps you'll use your business logo on everything, or a picture of the same piece on the cover of each thing, so every piece of advertising, each hand-out, tells people this is YOUR work, without them even having to read your name.  If your work is elegant and refined, your Website and other materials should be elegant and refined.  If your work is more eclectic or funky or whatever, then your website and everything else should have the same feel.  You want to create a "presence" that's recognizable. 

Think of Nike and their "swoosh" - all you have to see is that "swoosh" and you know it's a Nike product, which tells you something about its quality, style and price without you even looking for that information because you know the brand.  Find a way to make your work that recognizable.  I can recognize a Kimberly Kelly Santini painting the instant I see it - her style is that unique (to my eye, anyway).  Same with Elin PendletonDebbie Flood , Shary Akers and many other artists.

Create a unified presence with a real similarity in style or palette among your works.  My bronzes are COLORFUL because I want them to look like real horses.  I rarely  use the French brown patina people think of as "bronze" color - it's good for outdoor art because it's durable, but there are many more interesting choices for indoor sculptures.  I have my bronzes finished with translucent patinas so the metal glitters through just as a real horse's clean summer coat glitters metallically in the sun.  I haven't seen anyone else use such patinas on horses the way I do, and that's fine with me!  The few paintings I've done are bold-colored and look more like stained glass than realistic horses, and I like them that way.  If I ever produce paintings I think are worth selling, they will be bold and probably a bit stylized since I can't draw as well as I'd like to.  But they will fit in my "colorful" style.  (That's my "Frolic" show above.)

Stand back and look at your work.  There is a uniformity or a thread of continuity to it somehow - that's your style.  Find ways to emphasize that in all your advertising and in your booth setup.  For instance, I don't use black drapes for my table covers.  Mine are a slate blue and my carpet is light beige - it's a light, bright, elegant but cheerful booth.  Early in my career, I followed someone else's advice on how to make my booth elegant and used to use black drapes, but all the Friesians I do faded into the black when it was behind them, and I found that much black to be kind of overwhelming, so I went for contrast with the art, and lighter, pretty colors to keep me happy.

There are tons of books out on marketing your art.  Go buy at least one of them - preferably two or three so you can compare methods between them - and then do what they say!!  Do your own research and figure out what will work for you.  Nobody but NOBODY can sell your art like you can!  Believe it!

Thursday, August 25, 2011

Digitally Enlarging the Maquette to Life-Size


Yes, I published this post in August.  I was going to send it to a friend and discovered the formatting had gone all wonky!  So I'm fixing it and re-publishing it.  The bronze is finished now and will be installed in April!  YAY!

* * * *

My life-size piece is being cast in bronze now. I can't wait to see it!! My husband and I went to Oregon for 9 days for me to work on the enlargement to make sure it was exactly the way I wanted it. My customer came out in the middle of the week to see it and make sure it was how he wanted it too. It passed both of our inspections by the end of the week! 

 The digital enlarging method ROCKS! First, the piece is scanned by a computer, then it's cut out by a 12' long 7-axis robotic arm (like the kind used in the auto industry), then clay is applied and ART happens! The scanner doesn't get into tight spots, so there was a curve that attached the testicles to the gaskins, instead of the line of separation that should've been there, but it was EASY to carve out the Styrofoam and touch up the area with additional clay. The horse's buttocks and tail created such a shadow, the scanner missed scanning the rectum completely, so I had to add that to the life-size, which again was no big deal. The enlarging place has a whole staff of people with degrees with  sculpting working on the piece along with me, my husband and even my customer (who said I was like Tom Sawyer, getting everyone to work on it, LOL!) 

 When you go from maquette to life-size, any tiny errors in the maquette will show up as large errors (the life-size in this case is 700 times bigger than the maquette). Thankfully, no errors showed up once it was enlarged except for one ear not being set quite as straight as I wanted it to be (on the maquette, it looked fine, so it really was a small error). With help from the crew (since I didn't know how to do it), I cut the Styrofoam ear off, put it at the angle I wanted, secured it with a pointed dowel rod, then squirted glue under the gap. It's a foaming kind of glue from a caulking gun, so it expands and fills gaps. It's also easy to carve or rasp off if it's in the way. The dowel was hammered farther into the foam so it would be easy to pull out, then removed. Voila! Perfect ears!! The scanner made the edges of the ears and nostrils too thick because of its inability to "see" sharp edges like that. No biggie. I carved them off with a bread knife, then built up the clay to what I wanted. 

Once the piece was fully assembled and all the finishing work done, it was cut into pieces to be sent to the foundry for casting. I worked from 8-5 for a week (and my shoulder didn't hurt much at all thanks to a cortisone shot the previous week!) It was hard work but I learned SO much!!!! And the piece is GORGEOUS! (Not just my humble opinion, either! LOL) The 12' long 7-axis robotic arm that's shown in the pictures can do a two day job in two hours! That's pretty darned amazing! You might notice in the following pictures that the edges of the hooves weren't as "crisp" as the edges of real hooves are. That was due to the way the machine cut them out. My customer fixed the hoof edges for me - I asked him to add that clay and he got it in really good shape himself before I came along and did the fine tuning.  He sure enjoyed himself, and he'll be able to point to certain parts on the bronze and be able to tell his friends that he did that!  I think that's great!  :) 

This was a FABULOUS experience for me!  I hope I get more life-size commissions so I can go through this process again!

Below you can see the robotic arm cutting out the head and neck - the horse's face is to the left and the back edge of his neck to the right. This is the same kind of Styrofoam used to insulate office buildings. It comes in 8" thick blocks.


The computer split the scan of the legs and tail in half lengthwise.  These parts are being cut out on this router table and will be glued together later.


Below is one of the master sculptors who works at the enlarging shop, working on the detailing of the mane. In the life-size, the details I put in the maquette's mane and tail weren't dynamic enough, so clay was added to make them a better size for the life-size. The sculptors there can do all the work for the original sculptor, either at their direction or without them even being there. Apparently I was unusual because I jumped right in and worked alongside them, which made sense to me - it's MY piece! My hands needed to be in every aspect of creating it!


Yeah, I'm happy with it! Awed by it, actually. It's amazing - and HUGE! Eight feet tall by 9 feet long without the cart it's mounted on at the moment.


I wish my parents were alive. It would be such a kick to be able to send this photo to them and say, "Look what I did!" :) I know they'd hang the picture on their fridge.


Monday, May 02, 2011

Updates on "Tolt" and "Nanning"

"Tolt" is in metal!  I got some "approval pics" from the foundry last week.  There are a couple of things I want them to fix (the reins should not be looped up above the rider's hands, and the stirrups are too far back on the feet), but overall, it's beautiful!! 


The maquette of Nanning is coming along well.  I've added hair to the tail and have started putting clay on for the mane, but the clay for the mane isn't "installed" yet.  It's just lying there on the surface in strands much too thick for the finished version because right now, I'm just working out the movement of the mane.  Once I've figured out how I want it to be, I'll thin those strands and make sure they're well-attached to the sculpture, as well as having mane on both sides of the neck..


I enjoy working on the "hairy" parts of horse sculptures.  That's where I can get more creative with it.  I think he's going to be gorgeous!!

Sunday, February 27, 2011

Progress, progress, progress!

I wish I'd taken a picture of Nanning's head when I finished work today - I spent most of today on it and there are a lot of changes.  I'll just have to post the pic another day!

In the meantime . . . I've done a lot of work on his back legs and rump, and now he has four legs, which I'm sure will make him very happy!  LOL  Normally I work with the horse's feet on the ground and build up "grass" around his feet, so I don't have to pay attention to how "level" they are - it all works out fine when they're on the ground.  But this one's in mid-air for several reasons.  For one thing, the owner wants the piece to be of just the horse, no ground under him, and for a life-sized piece, that's a good design.  It saves money (less bronze to cast, less weight to support, less expense in shipping, etc.) and looks more natural than it would with a "pad" of grass under it as a life-size horse.  To balance, three feet have to touch the ground, so I've had to lower the right hind leg to have the toe touch the ground, which isn't the way it is in the photo, but it's only off by a few inches.  I also had to straighten his front leg, which is bent in the photo, so he would have two feet completely flat on the ground, which will make him stronger.

Here's how I'm checking how level his feet are:
That's a piece of cardboard (from a calendar) that I've cut a slot in so it will fit around the post.  The level is way off right now, but the right front hoof still has a wire sticking out of the bottom, so it won't be level front to back until I cut that off.  I was mostly checking to see how the back feet were doing.  They're not too far off, so I'm happy about that.

Here's how he looked yesterday before I did all that work on his head.  I'll post the revised (and much prettier) head soon.


I'm still not happy with his hind legs, but he's in such an extreme posture (he was playing - horses can get into all kind of extreme positions when they play!), it's hard to get it exactly right early on.  My way of working is to build the horse too big and with everything in place as well as possible to start with, then carve away what isn't the horse I'm working on, making adjustments, either tiny or large ones, as needed.  He'll be gorgeous and his pose will make sense once I'm done with it!  I think I have at least a month's more work to do before he's finished.

The jumper is painted and finished, ready to be mounted on the walnut plaque.  Here's how it looks finished.  It's name is "Rolltop."

It's on a paper towel that has black paint and gold Rub 'n' Buff on it from me finishing a bunch of medallions as well as this relief.  I'm happy with how this turned out!  I think it will make a beautiful trophy.

Monday, August 30, 2010

All but the Signature . . . I hope!

I think "Tolt" is nearly finished.  I just have to clean up the clay, make the pads under the horse's feet more uniform in shape and sign the title, my name and copyright along the sides of those pads.  Then I have to clean all that up too.  (Signing sculptures is a pain - nowhere near as easy to do as signing a painting!) 

I've spent literally two to three weeks pondering and picking at and trying to sculpt the rider's hands until today when I finally got everything to work the way I wanted.  It's very hard to sculpt the part of the fingers and palm that are near the horse, so I finally turned the forearms and hands out away from the horse so I could see the inside shapes better.  There are suggestions of fingernails there and even my customer's gorgeous sapphire ring is shown as a general shape on her left hand.  Her arms and hands were hard for me to do - getting the muscling and the shapes of the parts right is quite a challenge, but I think everything's good now.

I like the way the wrinkles turned out in her shirt and breeches.  I textured her clothing to make it look different from her skin when it's bronze.  I think it will be a nice look to have that slight texture on the cloth.

The clay stirrups you see on the working surface won't be the ones used.  I made Super Sculpey ones so they'll be sturdier to ship (Super Sculpey is a polymer clay you can bake in the oven so it's hard, unlike plastilene which is always soft.)  The stirrups, stirrup leathers and reins will all be hand-made at the foundry for each piece, although they MAY be able to cast the stirrups.  I'm not sure if they're thick enough to cast well unless they use jewelry-type casting (centrifugal casting). 

Without further ado, here are the pictures!

The shape behind the hoof is supposed to be a splash of dirt.  I may change it a bit before declaring a victory on this piece.
When I saw this pic, I realized I need to add a browband.  I'll do that tomorrow.

  I'll be glad to get this one finished!  I've been working on it a long time, but I'm happy with how it's turned out.

Tuesday, July 27, 2010

Beginning of the end - I hope!

I'm getting close to finishing this piece, HUZZAH!  I just need to add a bridle on the horse and do the wrists and hands of the rider, thicken the tail a bit and make the rider's eyes match better - they're a tiny bit off.  Then I have to sign it and I'm finished!!
The horse's tail is nice and thick-looking from the back, but from the side, it isn't quite bushy enough.  Like most Icelandics, this mare has a really thick mane and tail.  I think the mane looks pretty good, but the tail needs to be thicker and needs more movement as seen from each side.  I'll work on that today.

The "splash" you see behind that right hind foot is necessary for support and strength for the piece.  In real life, that foot would be flying through the air like both left feet, but the horse needs more than one point of contact with the base in order to be strong enough to stand without bending the supporting leg.  The "splash" of dirt may be modified a bit, I don't know yet.  It's easy to sculpt them in relief, but doing them 3-D, it's a lot harder to get the look I want.

The stirrups are on the working surface (the board) in front of the piece in the photo above.  They won't be attached until the piece is in bronze because they are too delicate to cast properly.  They will be hand made for each sculpture, just as the bit rings, stirrup leathers and reins will be.  I think I'm going to remake the stirrups out of Super Sculpey so they'll ship more safely.

See how nice and thick her tail looks from behind?  I need to get that feeling from each side too.  Her ears barely show from all the flying forelock in real life.  I'm still trying to decide if I want to put more forelock on her to hide more of her ears or not.  What do you think?  I'm open to suggestions!

The rider's neck looks a bit rough because I haven't cleaned this sculpture up with chemicals yet.  When I finish, I'll use a small filbert paint brush and some orange cleaning liquid straight from the bottle (I'll squirt it into a small bowl I can dip the brush in) and paint the whole thing with the cleaning liquid.  That chemical will melt the surface of the clay just a tiny bit, smoothing out some places and getting rid of the crumbs as well.  I may still need to do some clean-up with tools after I use the chemical, but the chemical will show me where I need to do that.

She looks like my customer, which pleases me a lot since I haven't done a sculpture of someone with an open smile before.  Every picture I have of her, she's got a happy smile on her face, so that's what I used.

I have stirrup leathers on the inside of the rider's legs, cut off at the point where they would not be against hte leg in real life as they stretch to support the stirrups.  The foundry will add flattened copper wire the width of the leathers I've started when they put the stirrups on.

If you have questions or comments, feel free to write me!  Thanks for your interest.

Tuesday, July 06, 2010

Ahhh, that's better . . . "Tolt" and "Star Sons 2" news!!

I finally saw what was bothering me about the rider's face.  I knew something was a bit off, but I couldn't quite figure out how to fix it.  Then I saw it.  The eyes were set too high (by about 1/16th of an inch), and the place where the nose dips in toward the eyes was set in the wrong place (by an even smaller margin).  So today I put dabs of clay in the places where the eyes were, smoothed that out and started over - not my favorite thing to do, especially on something as delicate and difficult to create as the eyes on this rider.  But I did it, and revised the shape of her cheekbones somewhat, her temples and browbone, the nose, and even brought the brim of the helmet lower and trimmed some off the top of the helmet.  I like it a lot better now.  I think I need to broaden the lower cheeks and jaw just a tiny bit on each side, and then it just might look like my customer!  YAY!  Here are some pictures to show what I accomplished today.

I know her helmet still needs straps, but I'm not going to add them until I'm satisfied with her face.

As you may be able to see from the pictures above, and will certainly see in the picture below, I also started working on the mane, getting the masses of the flying mane and forelock somewhat defined on one side, as well as filling in holes and undercuts so it will cast well.

I think this will be a beautiful piece!  I'm excited to see it coming together so well!

In other news, I've finished the revisions on my second "Star Sons" novel (titled "The Gathering Alliance") and am printing it out right now for a final read-through to make sure I haven't missed anything in proofreading.  The cover art is finished and there are only a few details to complete before it will be ready for publication.  HUZZAH!!!  I'll post ordering info here and on Facebook and my Yahoo groups when it's ready to go.  It will be available from me as well as from Amazon.com, BN.com and various other outlets. You will also be able to order it in your local bookstore with its ISBN number.  I'm excited to have this finished!  YAAAY!!

Wednesday, June 09, 2010

Boots, breeches and stirrups

Today I made stirrups for my rider.  That's a lot  harder than you'd think.  It took me a while to find the right size wire to be the top of the stirrup (to look the right size while covered with clay) and to make the tread of the stirrup strong and straight.  I used scraps from the perforated aluminum sheet I'm using as the armature for Feather's wings to make the tread strong and straight and aluminum armature wire for the top.  The bottom loop where the stirrup leather goes through was added by just putting a roll of clay there and carving it down.  You may be able to see that on the pic of the rider with the stirrup in place.

That pic is a bit crooked, sorry.  The leather goes up inside the rider's leg and is adhered to her leg and the horse, in the appropriate places.  I'll cut the stirrup off the piece just above where the leather goes through the stirrup when I get ready to send it to the foundry.  It would just drop off if the piece was dropped or shaken as it will be in shipping.  They can weld it in place in bronze.

The boots and breeches are done, and I think you can see the bottom of her shirt.  She was wearing a blouse that wasn't tucked in, and for now, I'm sculpting what she was wearing.  I'm going to send her pics soon so she can decide if she wants her shirt tucked in, sleeves on the shirt (her shirt was sleeveless), etc.

This shot's a bit closer, but also crooked - hard to get great shots with a phone.  I'll straighten these pics and re-upload them when I have more time.  I'm kinda rushing to get this online right now. 

BTW, this hind foot will soon be cut free of the wire holding it to the ground.  This foot in reality wouldn't have any dirt splashing up to support it, so I have to make it free.  I talked to my foundry about it to make sure having only two legs on one side would be strong enough to support a piece this big without it bending.  Bronze is soft, after all - it's mostly made out of copper.  Anyway, they said it should be fine, and they'll put bronze rods inside the legs touching the ground to strengthen them if they think that support will be needed.

When I cut this foot free, I will cut the wire up inside the hoof (thus ruining that nice hoof, so I'll have to sculpt it again) and then I'll put a wall, sole and frog in the bottom of the foot.

This is how the whole piece looks right now.  I haven't done any work above the waist - it's all just "placeholders" for now, measured pretty well, but not sculpted anywhere near what those parts will be like when it's finished.  I need to raise the shoulders a bit - they're too low.

Anyway, that's progress to date!  Comments and questions are welcome.

Thursday, June 03, 2010

Progress!

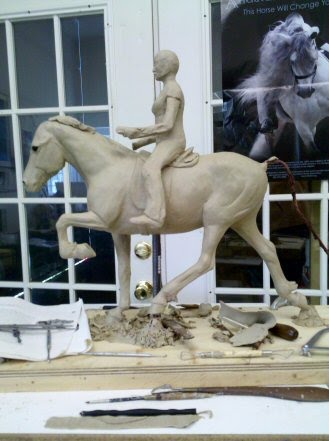
It finally looks like I'm getting somewhere on this piece!  A lot of the previous work has been painstaking and tedious, trying to get the horse built properly, making sure there are no dips or bumps where there shouldn't be, and making the horse a functional being with all the joints in the proper places, etc.  Now I've added a saddle and the rider.  The rider will be removed for shipping - she's only attached by a couple of wires sticking out below her seat bones into the horse.  She'll be welded or soldered in place by the foundry when this piece is cast in bronze.

The saddle is supposed to be an Icelandic saddle.  In addition to looking at the photos I took of my client's two saddles, I researched them online and found quite a wide variation in how they look.  I'm going with the English show saddle look rather than the quilted seat I found on several Icelandic saddles simply because it's less distracting visually to have a smooth seat rather than a quilted one.  I will probably cut the flaps a little shorter - they look too long in comparison with the rider's leg.

I've had to redo the cantle of the saddle about five times now, trying to get it placed right and to make it fit the horse and rider both as well as possible.  I think I'm about there with the cantle.  Now I'm working on the length of the rider's legs and the shape of her boots.  I realized I had cut the wire too short on one leg and had to add some wire to have a good support for her foot.  That's why I'm posting these pics today, to show you how I did that repair.

I've cut off the clay at the bottom of her leg, exposing the wire.  I then attached a lighter wire, wrapping it securely around the existing wire of the leg, using pliers to help me get it as tight as possible.  After wrapping it several times around the larger wire to make it as secure as possible, I started twisting the wire to both strengthen the wire and to give the clay something to bite into so it won't slide around.  (Aluminum wire is slippery to clay if it isn't either twisted itself or isn't wrapped around another wire.)  I doubled the twisted wire (shown above) back on itself and twisted it some more to make it stronger (not shown), then added clay over that to make the new foot.

Here's a closeup of the wire before I folded it back on itself and twisted it again.

Here's the other side of the piece.  This leg is actually a bit too short too, but there's plenty of wire there.  I'll pull the clay off the foot, straighten the wire for a short distance to lengthen the leg, then bend the end up to support the foot and add clay to make the boot again.

I'm having to fight my dressage training in positioning the rider.  She doesn't ride dressage nor do other Icelandic riders (with a few exceptions I know of), so putting her in a dressage position would be wrong.  I haven't had this much trouble positioning a rider in a long time - I guess that shows my dressage training is becoming ingrained!  But I need to be careful about that with my art.  Not all riders ride dressage.

That gorgeous picture behind the sculpture is the International Andalusian & Luisitano Horse Association (IALHA) poster from a couple of years ago featuring the gorgeous stallion, Santiago.  His mane really does reach down past his knees and he seems to have a lovely disposition.  I was fortunate enough to see him at the Midwest Fiesta in 2008 and was given one of these posters then (I had my art booth there marketing my art while I was working on the original of "Feather," which is an Andy stallion now available in bronze).  I had no idea at the time that within a few months of that show, I'd have my very own half-Andalusian (El Paso Aricos, my dressage horse).  Surprise surprise!
This is a picture of my handsome Ricos with my daughter, trainer Jennifer Truett of Dancing Horse Farm, Lebanon OH (www.dhf-oh.com) riding him.  Since I mentioned him in reference to that IALHA poster, I thought I'd include his picture here.  I like this picture so much, I use it as my desktop.

Back to the sculpture:  Don't worry about the rider's face - right now her facial features are more "markers" than anything else.  She doesn't look like herself at all yet!  Her face is even a bit mashed because I grabbed her head and changed the angle of her neck and head from the side (they were too far back).  Her arms and hands haven't been worked on at all yet.  I'll get to them, don't worry!

A lot of sculpting (the way I do it, anyway!) seems to be "take two steps forward, three steps back" at times.  As I work around the piece, I may find that something that looked and measured right before is now too long or too short in relation to some other part and the reference material.  Just  by bending one leg of the rider down so it laid properly along the horse's side changed the way it looked lengthwise, so I had to make some adjustments.  That kind of thing happens frequently.  Just one of the many challenges of 3-D work!

The little lump of clay on the horse's neck is a sign of my eagerness to get to the mane and tail.  They're some of the last things I do on a sculpture, but they're also FUN so I'm eager to get to them.  But it's too soon, so I was just messing around and left it there.

I'm pleased with the progress so far.  Yay!

Saturday, May 22, 2010

Details, details, details . . .

Now I'm at the point of building the saddle on the horse and making sure it fits the rider.  The rider is nowhere near perfect yet, but she's about as thick as she's going to be front to back (this is a petite middle-aged rider).  I  may need to adjust the length of her legs once I get back to work on her, but for now, I'm just getting the saddle assembled and placed where it should be.  I know I need to get her body more proportionate and to get her sitting on her seat bones.  I'll get there eventually.

At first, I had the saddle a bit long for this rider - If you look carefully, you should be able to see I've just cut the clay at the back of the cantle so it fits the rider better.  I've just turned a bit of clay over to fill in some of the seat behind her, actually, and then put a cut behind the cantle as a marker for when I get back to work on it.

You can also see I've put feathers on three of the legs now, and those legs have also developed muscles, bones and tendons.  I've put a bit of clay on the neck as well, starting to plan out the movement of the mane.  The strips of clay ahead of where the saddle's knee rolls should be in the picture below are just extra pieces I haven't trimmed off yet.  I've only developed the saddle on the left side and a bit on top.  The right side will be done tomorrow.


Here are some detail shots of the horse and rider. 

Don't worry, her ankles and feet will be straight with no wire sticking out of them when I get finished.  For now, this is very much a work in progress.  The knee rolls are just being developed and will be shaped better before I declare a victory over them.

I'm pretty pleased with how it's coming along.  Hope you enjoy seeing its progress!